
Knowledge, WordPress Tutorials
How to Speed Up a Slow WordPress Website
Jul
If you need to speed up a slow WordPress website, you must understand that performance directly impacts both user experience and search engine visibility. A website that takes too long to load will experience higher bounce rates, leading to lost traffic, lower conversions, and reduced revenue. Search engines like Google also prioritize fast-loading websites through their Core Web Vitals metrics. This documentation provides a comprehensive guide on identifying performance bottlenecks and implementing standard optimization techniques. By following these steps, website owners and WordPress beginners can successfully configure caching plugins, optimize media files, and ensure their website runs at optimal efficiency around the clock.
Initializing Your Speed Optimization Plugin
To effectively improve your website’s loading times, installing a dedicated caching and performance optimization plugin is the most efficient and practical approach. The following steps outline the process of downloading, installing, and configuring your optimization tool for the first time to ensure maximum compatibility and speed.
Step 1: Downloading and Installing the Plugin
Begin by selecting a reputable caching plugin from the WordPress repository or downloading the file from a premium provider.
-
Navigate to your WordPress administrative dashboard.
-
Go to Plugins > Add New on the left-hand menu.
-
Search for your preferred caching plugin (such as WP Rocket, LiteSpeed Cache, or W3 Total Cache, and another interesting plugin I’d recommend is WPStore+ Cache Optimizer). Alternatively, click Upload Plugin at the top of the screen if you have downloaded a premium
.zipfile. Therefore, I will be using the WPStore+ Cache Optimizer plugin as an example for this article. -
Click Install Now. Before proceeding, ensure that your hosting environment meets the minimum PHP version requirements stated by the plugin developer to avoid critical errors.
Step 2: Activating the License 🔐
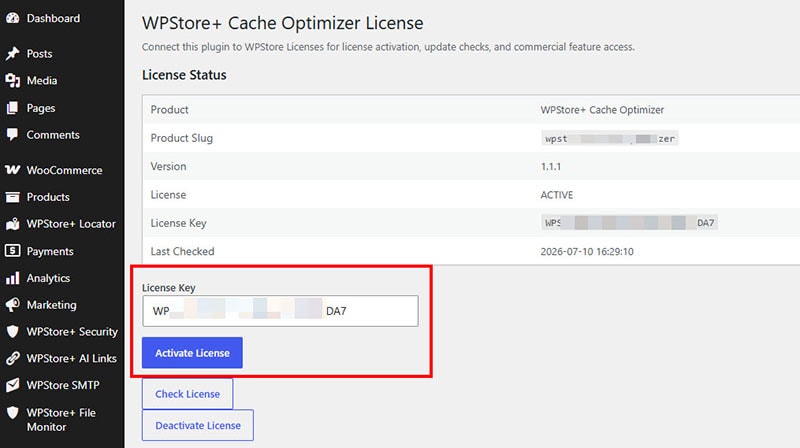
If you are utilizing a premium optimization plugin, you must authenticate your license. This step is critical to access advanced performance features and receive continuous security updates.
-
After the installation is complete, click the Activate button.
-
Locate the newly added plugin menu in your WordPress sidebar (often found under Settings or as a standalone menu item).
-
Navigate to the License, Account, or Activation tab.
-
Enter the unique license key provided to you upon purchase and click Verify or Activate License. Always verify that the connection to the validation server is successful, which is usually indicated by a green confirmation message.
Step 3: Configuring Basic Settings ✅
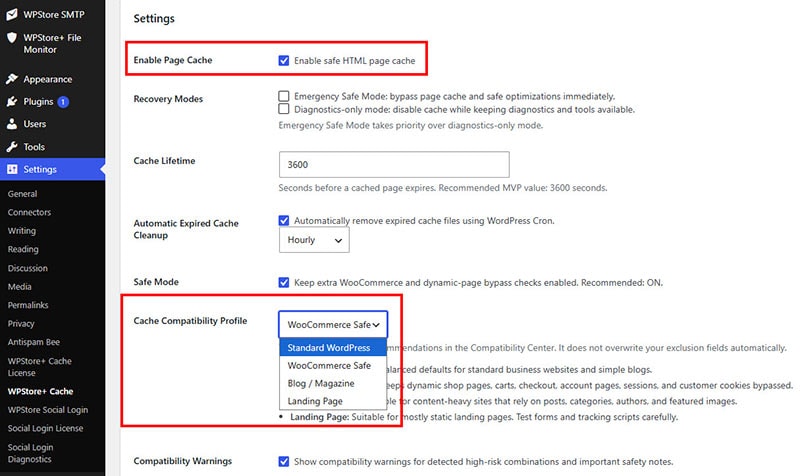
Once the plugin is active and licensed, you must configure the basic settings to establish a foundation for speed improvements. While features vary by plugin, the core settings remain consistent:
-
Page Caching: Enable page caching to generate and store static HTML versions of your dynamic WordPress pages. This prevents the server from querying the database every time a visitor loads a page, significantly reducing processing time.
-
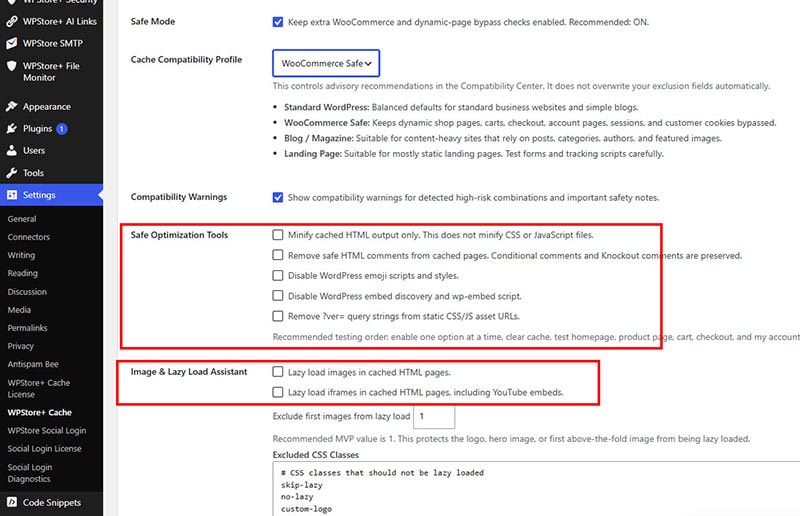
Minification and Combination: Turn on HTML, CSS, and JavaScript minification. This technical process removes unnecessary spaces, line breaks, and comments from your code, reducing overall file sizes.
-
Media Optimization: Enable lazy loading for images and iframes. This ensures that media elements are only loaded when they enter the visitor’s visible screen area (viewport), saving initial bandwidth and drastically lowering the initial page load time.
-
Database Optimization: Schedule regular database cleanups. Over time, WordPress accumulates post revisions, spam comments, and expired transients that can bloat your database and slow down critical background queries.
Testing the Plugin
After configuring your performance optimization settings, it is crucial to test the plugin to confirm that it is actively improving your website’s speed without breaking your theme’s layout or functionality.
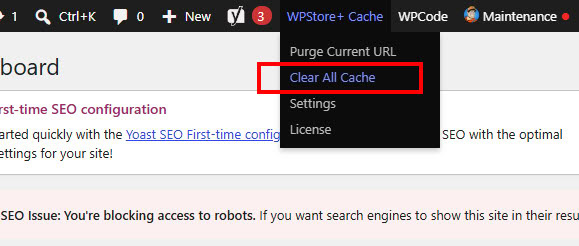
- Clear All Caches: Before conducting any tests, use your plugin’s dashboard to purge or clear all existing caches. This ensures you are viewing the most recent version of your site.
- Incognito Mode Visual Test: Open your website in a private or incognito browser window. Navigate through various pages, including the homepage, individual blog posts, and interactive contact forms. Verify that the visual layout remains intact and that menus and scripts function correctly.
- Professional Speed Testing Tools: Utilize professional performance testing tools such as Google PageSpeed Insights or GTmetrix. Run a test on your primary URL and compare the new scores with your previous baseline metrics. Pay close attention to improvements in Time to First Byte (TTFB) and Largest Contentful Paint (LCP).
FAQs 💬
Q: Why is my WordPress website so slow in the first place? A: Common causes include uploading large, unoptimized images, utilizing poorly coded themes, excessive use of heavy third-party plugins, a lack of server-side page caching, and inadequate web hosting resources.
Q: Will minifying CSS and JavaScript break my website’s design? A: In some cases, aggressive minification or file combination can cause visual display issues or break interactive scripts. If your site looks broken after enabling these specific features, disable them one by one to identify the conflicting setting, then clear your cache to restore the layout.
Q: Do I need to install multiple caching plugins for better results? A: No. Running multiple caching plugins simultaneously can cause severe software conflicts, resulting in broken pages and actually degrading your website’s performance. Stick to one comprehensive optimization solution.
Q: What is a CDN, and should I use one? A: A Content Delivery Network (CDN) stores copies of your website’s static files on servers located around the world. When a user visits your site, files are served from the location closest to them, speeding up delivery. Integrating a CDN with your caching plugin is highly recommended for sites with an international audience.
Summary 📍
Maintaining a fast, efficient WordPress website requires ongoing attention to performance metrics and the proper configuration of professional caching tools. By safely installing a reliable optimization plugin, validating your premium license, and carefully configuring fundamental settings like page caching, minification, and lazy loading, you establish a solid technical foundation. Always remember to clear your cache and test your website thoroughly after applying any new configurations to ensure a seamless, high-speed experience for all of your visitors.
Ready to boost your website performance? Explore our collection of premium WordPress optimization plugins at WPStore+ today!
If you’re having problems using your WordPress website, or if your website is experiencing any issues whatsoever, feel free to contact me. I’m happy to offer free consultation.