
Knowledge, WooCommerce
How to Delete the Uncategorized Category in WooCommerce
Jul
To delete the Uncategorized category in WooCommerce safely, you must first select another product category as the store’s default. WooCommerce requires every product to have a category, so it prevents the current default category from being deleted.
This guide explains how to review affected products, create or select a suitable replacement, change the default category, remove Uncategorized, and test the result. The entire process uses built-in WooCommerce features and does not require an additional plugin.
Why WooCommerce Will Not Delete Uncategorized
WooCommerce automatically creates a product category named Uncategorized during the initial setup. If a product is saved without a category, WooCommerce assigns it to the default product category.
For this reason, the category currently marked as default cannot be deleted. The Delete option may be missing when you hover over its name, or WooCommerce may prevent the deletion attempt.
According to the official WooCommerce product category documentation, a store must always have a default product category. You can remove Uncategorized only after another category has been made the default.
Requirements Before You Start
This procedure does not require a new plugin, download, installation, or license. However, WooCommerce must be installed and active, and your account must have permission to manage products and product categories.
Before changing the category structure:
- Create a current database or full-site backup.
- Confirm which products are assigned to Uncategorized.
- Choose a meaningful replacement category.
- Check whether the existing category URL is used in menus or internal links.
A backup is especially important on a production store with many products or custom integrations.
How to Delete the Uncategorized Category in WooCommerce
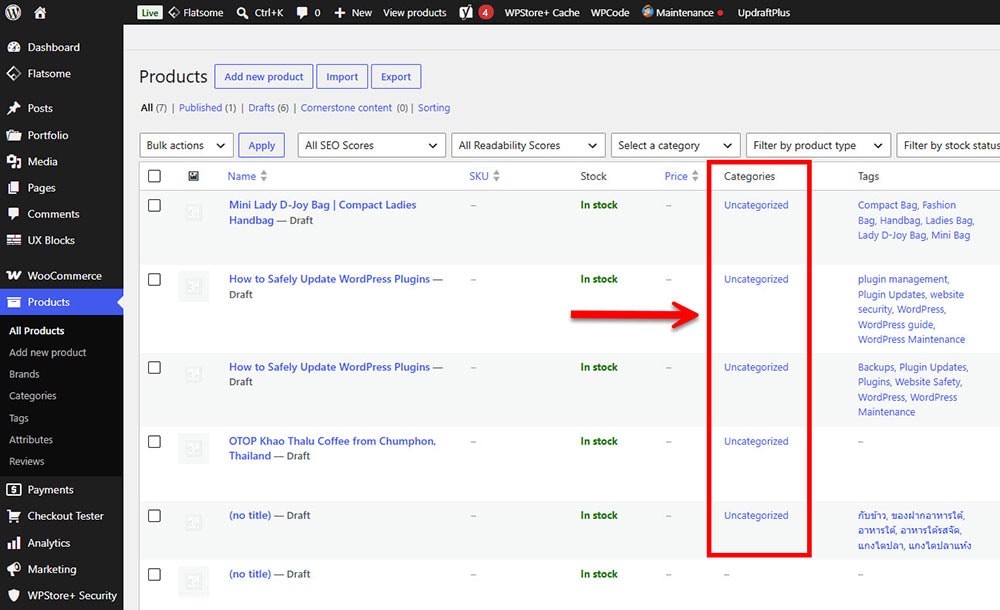
Step 1: Review Products in the Uncategorized Category
Go to Products → All Products in the WordPress Dashboard. Use the category filter to display products assigned to Uncategorized.
Review the results carefully. Some products may belong only to Uncategorized, while others may already have additional categories. Note which products need to be moved before deleting the category.
Step 2: Create a Replacement Product Category
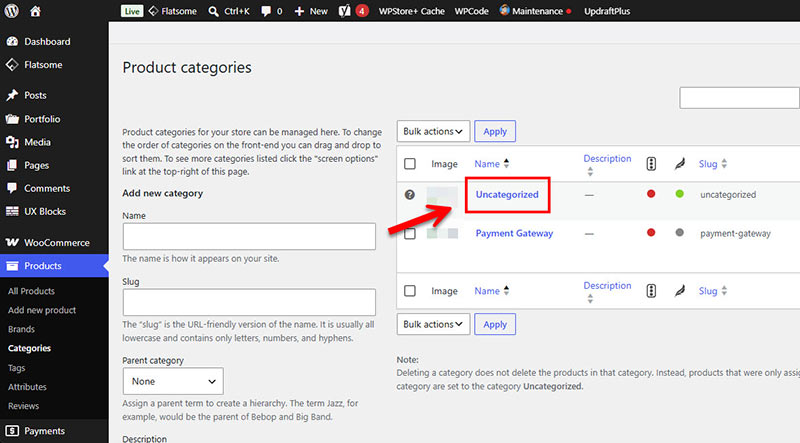
Navigate to Products → Categories. If you already have a suitable category, you can use it as the replacement. Otherwise, create a new category with a clear and relevant name, such as:
- General Products
- Shop
- Other Products
- A category representing your main product type
Enter the category name, create a short slug, add an optional description, and click Add New Product Category.
Avoid creating another vague category unless it accurately represents the products that may be assigned to it automatically.
Step 3: Reassign Existing Products
Return to Products → All Products and filter the list by Uncategorized. Select the affected products and choose Edit from the Bulk Actions menu. Click Apply.
In the Product Categories section, select the replacement category and remove Uncategorized where the interface permits. Click Update to save the changes.
WooCommerce’s bulk editing documentation confirms that product categories can be assigned to or removed from multiple selected products. For a small catalog, you may edit each product individually instead.
Step 4: Make the Replacement Category the Default
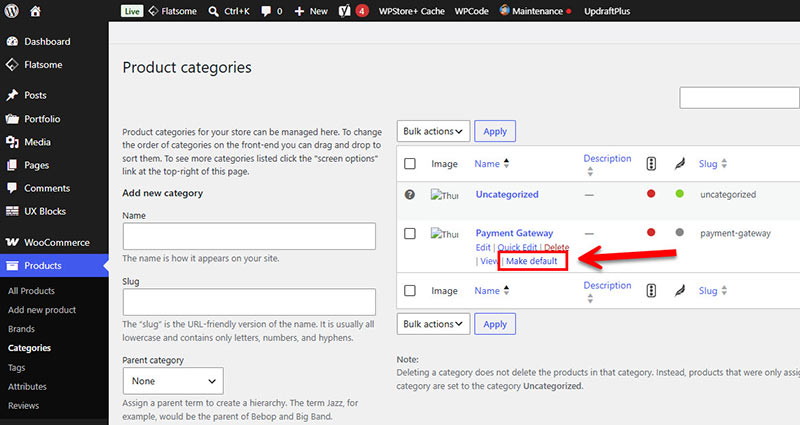
Go back to Products → Categories. Locate the category you want WooCommerce to use by default.
Hover over its name and click Make default. WooCommerce will mark this category as the new default. Any product saved without another selected category will now be assigned to it.
Confirm that the default marker has moved from Uncategorized to the replacement category before proceeding.
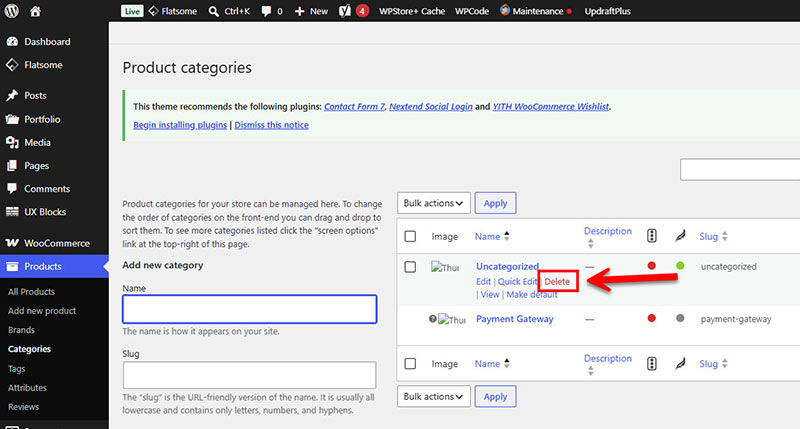
Step 5: Delete the Uncategorized Category
Locate Uncategorized on the same category management screen. After changing the default category, the Delete action should become available beneath its name.
Click Delete and confirm the action if prompted. This removes the category term, not the WooCommerce products themselves. Reassigning products beforehand is still recommended because it gives you direct control over the resulting catalog structure.
If the category was included in a navigation menu, widget, product filter, or page-builder element, remove or replace that reference separately.
Testing the WooCommerce Change
After deleting the category, perform the following checks before considering the task complete:
- Open Products → Categories and confirm that Uncategorized is no longer listed.
- Verify that the intended replacement category is marked as default.
- Open several affected products and confirm that each has an appropriate category.
- Visit the Shop page and relevant category archives on the storefront.
- Test product breadcrumbs, menus, filters, and category widgets.
- Clear the website, server, CDN, and browser caches if old category information remains visible.
You can also create a temporary draft product without selecting a category. Save the draft and verify that WooCommerce automatically assigns the new default category. Delete the temporary draft after testing.
If the former Uncategorized archive URL received traffic or had internal links, create a suitable 301 redirect to the most relevant replacement category rather than leaving the URL as a 404 page.
FAQs
Why is the Delete option missing for Uncategorized?
Uncategorized is probably still the default product category. Make another category the default under Products → Categories, then check again.
Can I rename Uncategorized instead of deleting it?
Yes. Renaming it is a suitable option when you want to retain the existing category assignments and archive URL. Choose a name that accurately describes the products it contains.
Will deleting the category delete my products?
No. Deleting a product category does not delete the products themselves. Nevertheless, assign affected products to appropriate categories first to keep the catalog organized.
Can WooCommerce operate without a default product category?
No. WooCommerce requires a default category so that products saved without another category still have a valid product-category assignment.
What should I do if Uncategorized returns later?
Check whether imported products, marketplace synchronization, or another integration is changing category assignments. Also confirm that your intended replacement category remains set as the default.
Summary
To delete the Uncategorized category in WooCommerce, first review affected products and assign them to appropriate categories. Create or select a replacement category, make it the default, and then delete Uncategorized from Products → Categories.
Afterward, test product assignments, storefront navigation, category archives, and the former category URL. These checks help maintain a clear product structure and prevent avoidable navigation or SEO issues.
Keep your WooCommerce catalog organized by reviewing product categories regularly. Explore the WPStore+ Knowledge Base for more practical WordPress and WooCommerce guides.