
Knowledge, WordPress Tutorials
How to Set Up WP Mail SMTP With Gmail API Using Google Cloud Console (2026 Guide)
Oct
Are your WordPress emails not being delivered? Whether you’re running a blog, membership website, or WooCommerce store, reliable email delivery is essential for password resets, contact form notifications, order confirmations, and other important messages. One way to improve your WordPress email configuration is to connect WP Mail SMTP with Gmail API through Google Cloud Console. This method allows your website to send emails through a Gmail or Google Workspace account using OAuth 2.0 authentication, without storing your Google account password directly in WordPress. In this step-by-step tutorial, we’ll show you how to configure WP Mail SMTP using Google Cloud Console, create your own OAuth Client ID and Client Secret, authorize your Google account, and test email delivery. The tutorial uses the manual setup method, which is supported by the free version of WP Mail SMTP.
What Is WP Mail SMTP?
WP Mail SMTP is a WordPress plugin designed to improve email delivery by connecting WordPress to an email service provider.
By default, WordPress uses the wp_mail() function to send email notifications. Depending on your hosting environment, this may rely on PHP’s mail functionality, which can be unreliable or incorrectly configured.
WP Mail SMTP allows you to use alternative delivery methods, including Gmail, Google Workspace, and dedicated transactional email providers.
Why Use Gmail API Instead of Traditional SMTP?
Connecting through Gmail API offers several advantages:
- OAuth 2.0 authentication: Your website does not need to store your Gmail account password.
- Google integration: WordPress sends messages through an authorized Gmail or Google Workspace account.
- Free plugin support: You can use the manual Gmail API connection with WP Mail SMTP Lite.
- WordPress compatibility: The connection can be used for notifications generated by compatible WordPress plugins.
- Centralized configuration: You can manage your email sender through the WP Mail SMTP settings.
However, Gmail has sending limits and is generally better suited to low-volume website notifications than large-scale transactional email delivery. For high-volume WooCommerce stores or marketing platforms, consider a dedicated transactional email service.
Requirements Before Getting Started
Before configuring WP Mail SMTP, make sure you have the following:
- A WordPress website with administrator access.
- The WP Mail SMTP plugin installed and activated.
- An active Gmail or Google Workspace account.
- Access to Google Cloud Console.
- An HTTPS-enabled WordPress website.
- A working email address for testing.
You’ll also need permission to create Google Cloud projects and OAuth credentials.
Step 1: Install and Configure WP Mail SMTP
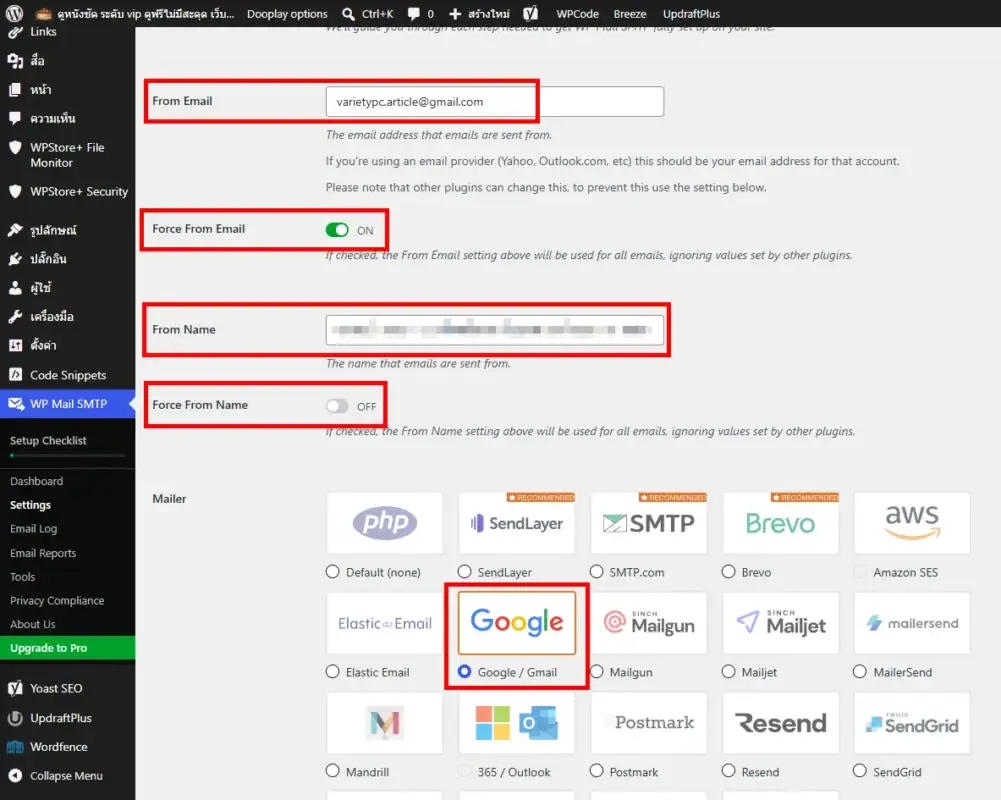
First, log in to your WordPress dashboard. Navigate to Plugins > Add New Plugin, then search for WP Mail SMTP. Install and activate the plugin. After activation, you may see the WP Mail SMTP Setup Wizard. You can use the wizard or return to the dashboard and configure the Gmail connection manually. Navigate to WP Mail SMTP > Settings > General.
Configure the Sender Email
In the From Email field, enter the Gmail or Google Workspace address you plan to authorize. You can enable Force From Email to make WordPress use this sender address for outgoing messages. Next, configure the From Name field. This can be your website name or business name. Enable Force From Name if you want to apply that sender name across your WordPress website.
Select Google / Gmail as Your Mailer
Scroll down to the Mailer section and select Google / Gmail. This opens the Gmail configuration panel, including:
- Client ID
- Client Secret
- Authorized redirect URI
- Google account authorization
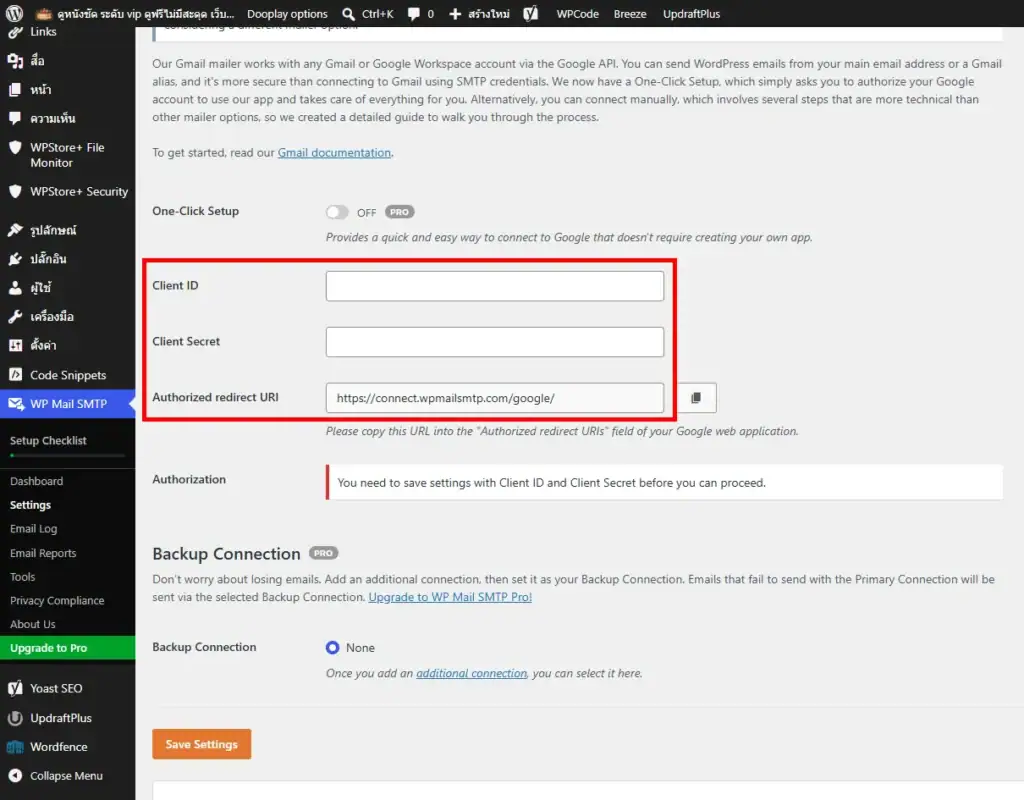
Leave this settings page open. We’ll return to it after creating the necessary OAuth credentials.
Step 2: Create a Google Cloud Project
Open Google Cloud Console in a new browser tab and sign in with your Google account. If this is your first time using Google Cloud Console, you may need to review and accept Google’s terms of service. Once you’re signed in, click the project selector at the top of the dashboard. Select New Project.
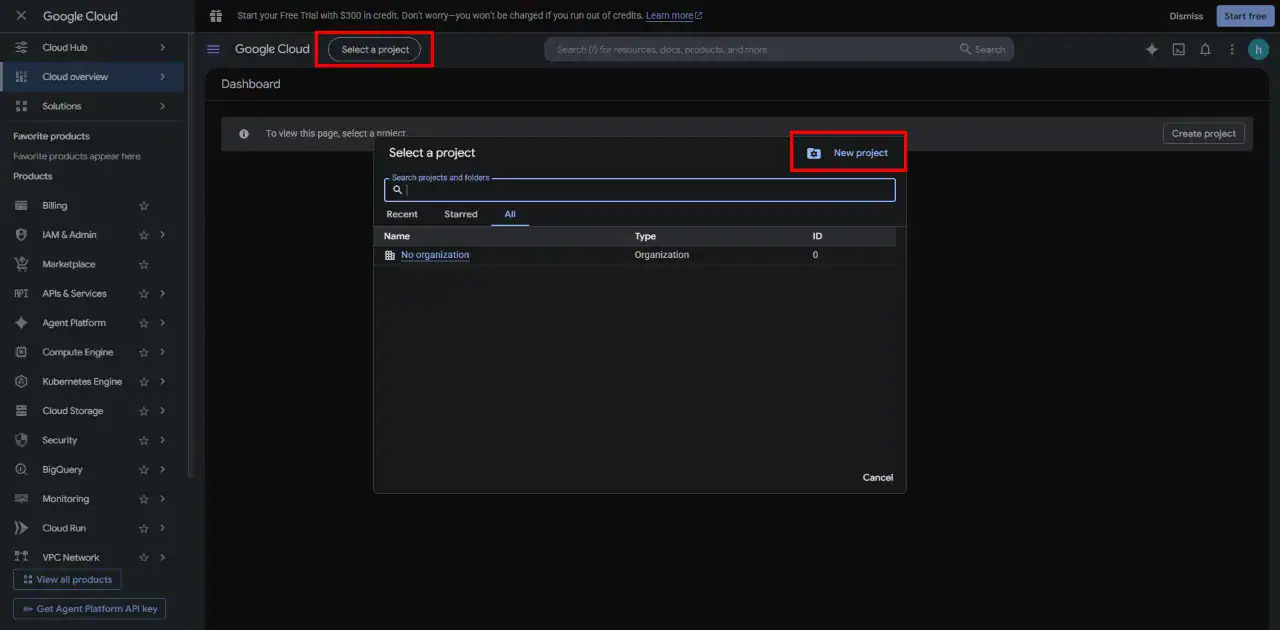
Enter a project name, such as:
WordPress Gmail SMTP
If you’re using a personal Gmail account, the parent resource will typically be No organization.
Click Create.
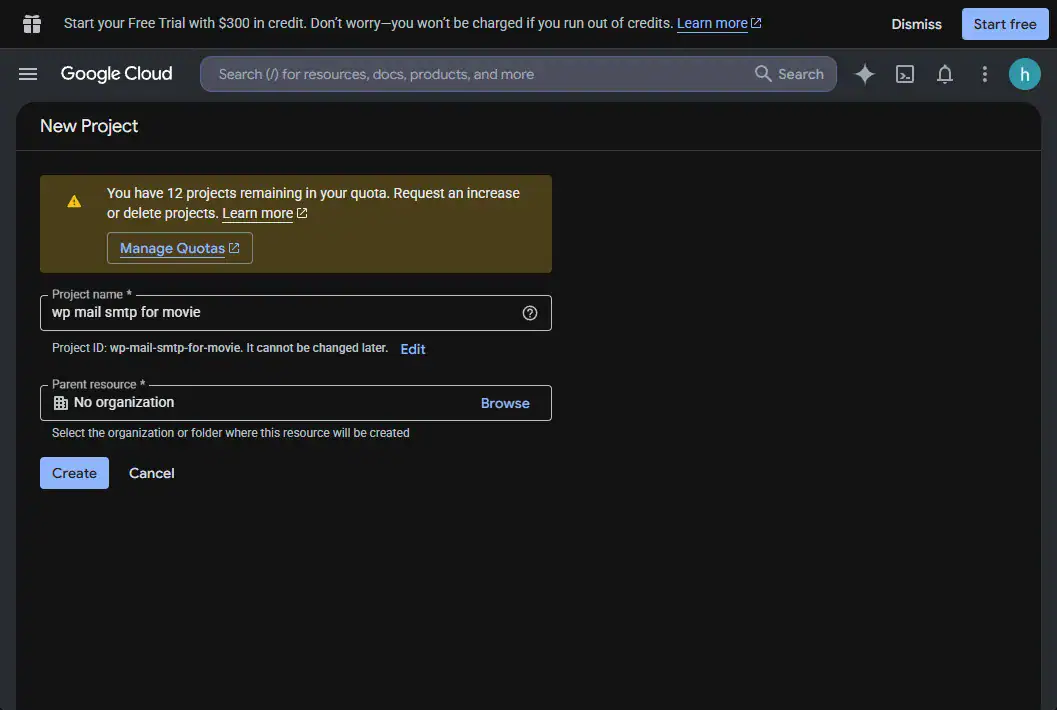
After creating the project, make sure it is selected before proceeding.
Step 3: Enable the Gmail API
From the Google Cloud Console navigation menu, go to: APIs & Services > Library In the API Library search field, enter: Gmail API Select the official Gmail API from the search results.
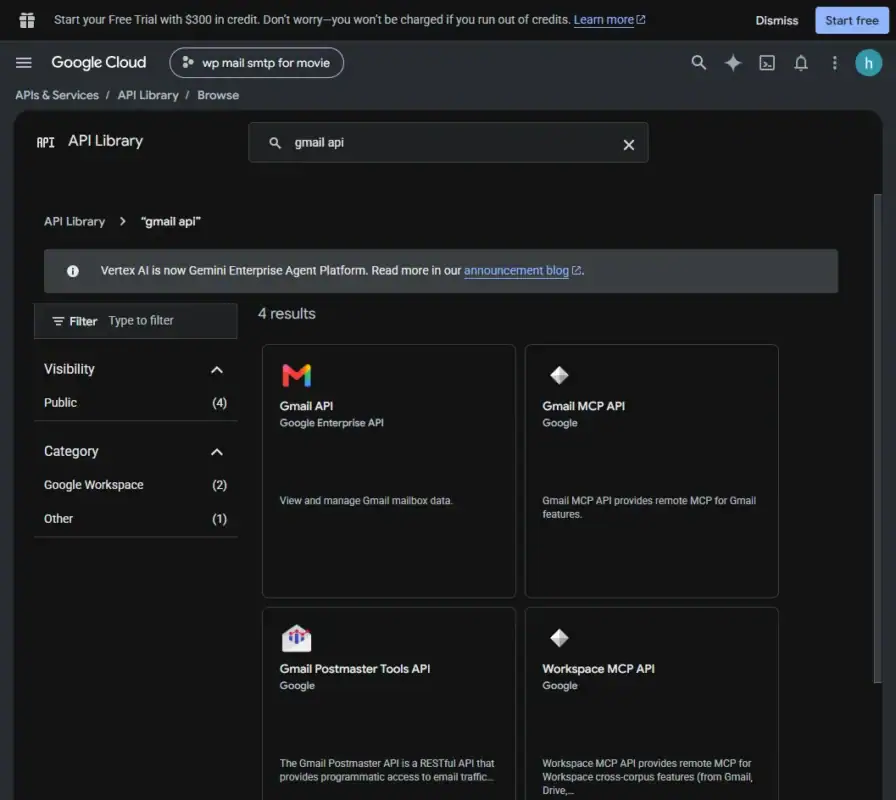
On the Gmail API details page, click Enable.
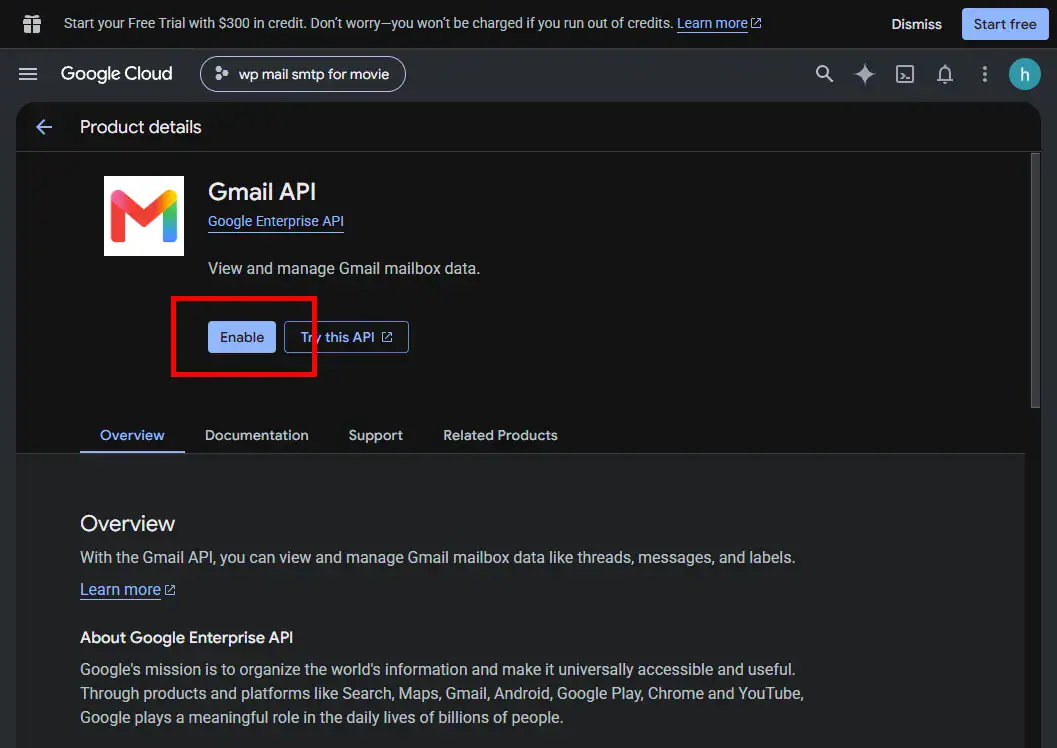
Enable Gmail API for your Google Cloud project.
Once the API is enabled, your Google Cloud project can be configured to request access to Gmail through OAuth authentication.
Step 4: Create OAuth Credentials
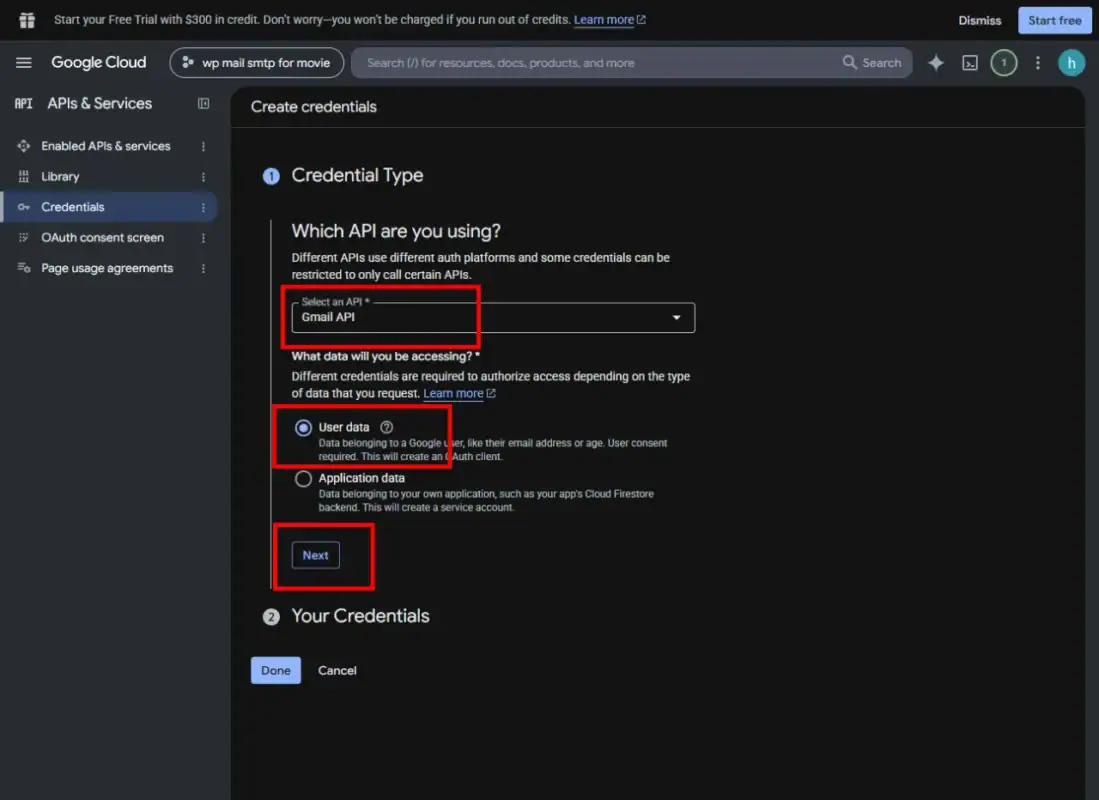
After enabling Gmail API, click Create Credentials. Google Cloud Console may display a guided credential setup process. Under the Credential Type section, configure the following:
- Which API are you using? Gmail API
- What data will you be accessing? User data
Select User data because the application needs permission to send email using an authorized Google account. Click Next.
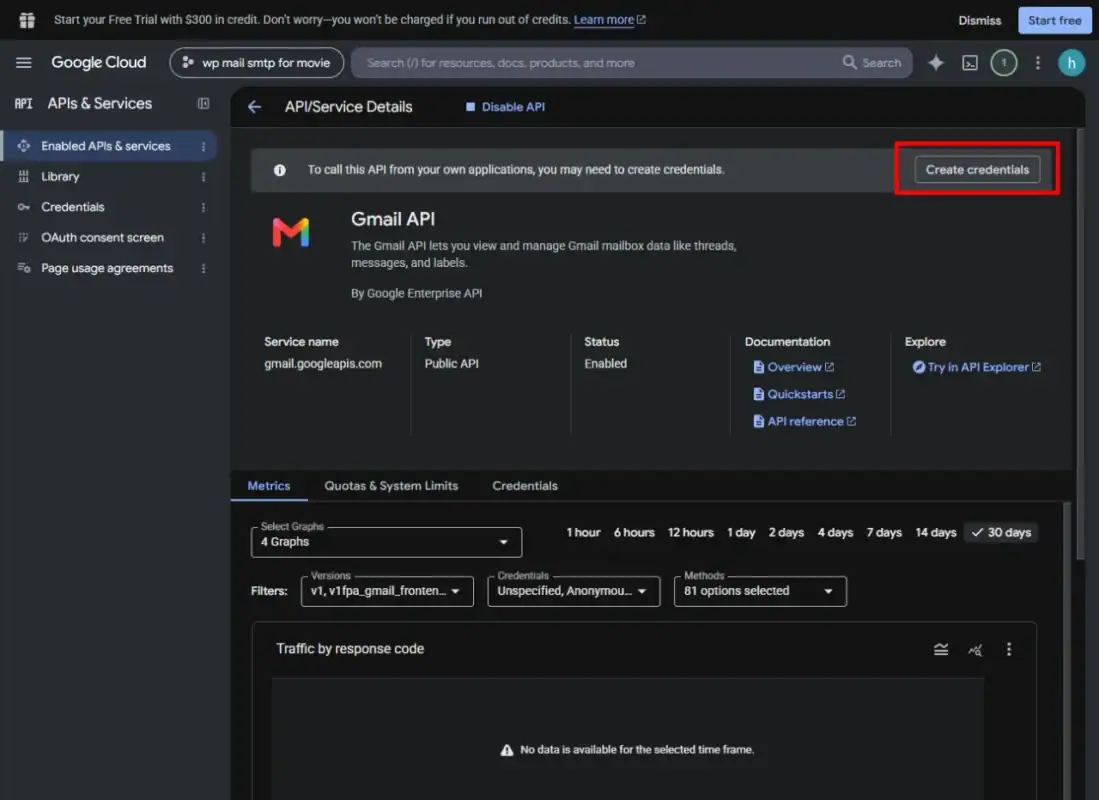
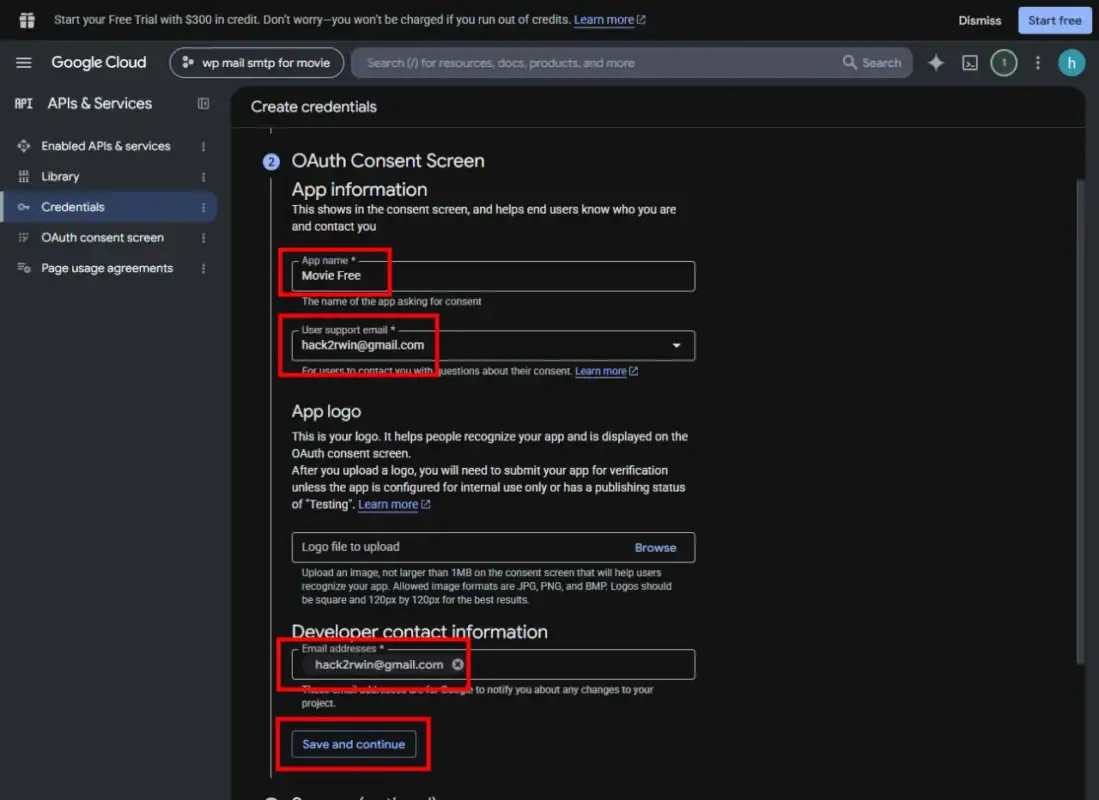
Step 5: Configure the OAuth Consent Screen
The OAuth consent screen identifies your application when it requests access to a Google account. Enter the required information: App name: WordPress Gmail SMTP User support email: Your Google account email address Developer contact information: Your email address An application logo is optional.
Click Save and Continue.
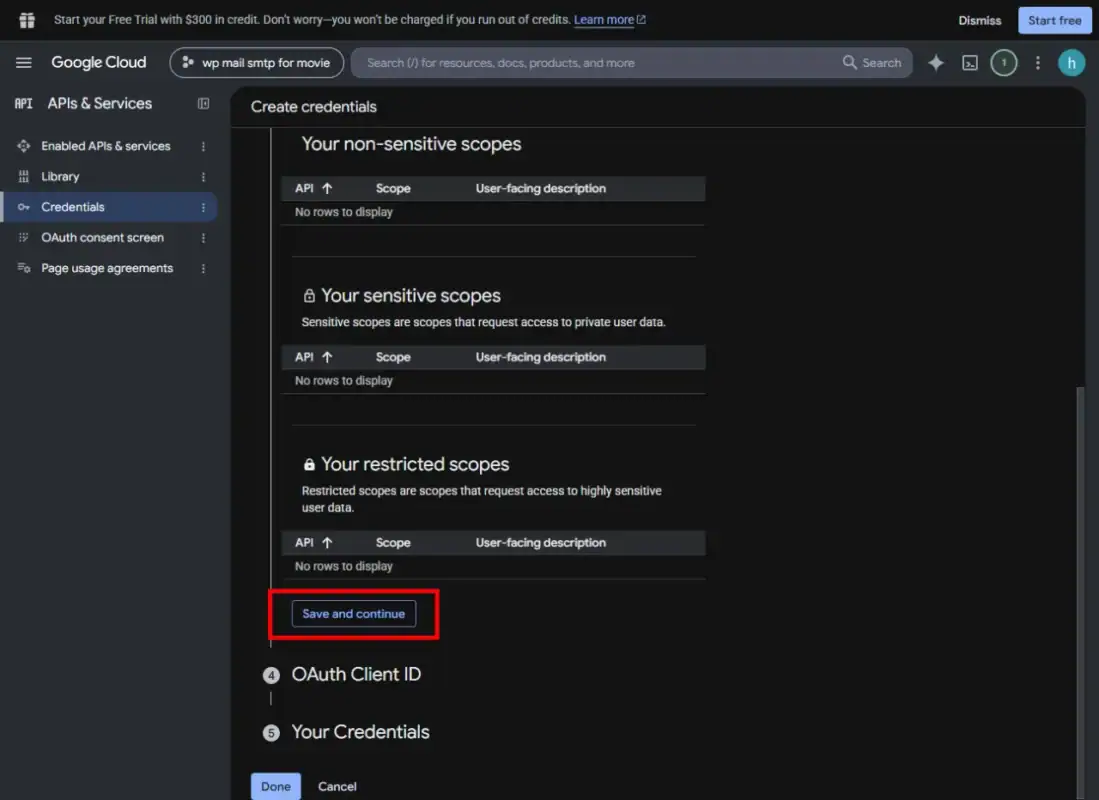
Configure OAuth Scopes
Google may display an optional Scopes configuration step. For the manual setup workflow shown here, you can continue without manually adding scopes. WP Mail SMTP requests the Gmail permissions required by its authorization flow. Review any permissions requested during Google account authorization.
Click Save and Continue.
Step 6: Create an OAuth Client ID
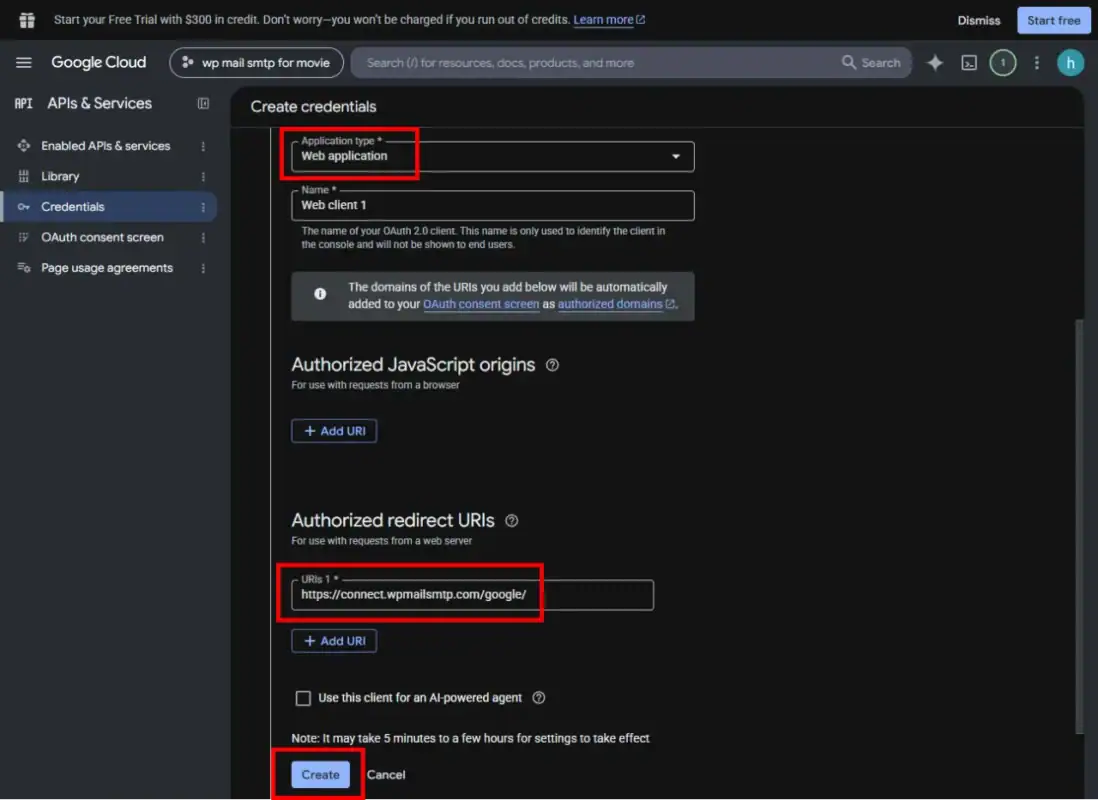
In the OAuth Client ID section, configure the following: Application type: Web application Name: WordPress SMTP Client You may also keep Google’s default name, such as Web client 1. Next, locate the Authorized redirect URIs section. Click Add URI and enter: https://connect.wpmailsmtp.com/google/ This is the default redirect URI used by WP Mail SMTP’s Google / Gmail mailer in this tutorial. Always confirm the URI displayed in your own WP Mail SMTP settings before copying it into Google Cloud Console. Do not enter this value in the Authorized JavaScript origins field.
Click Create to generate your credentials.
Step 7: Retrieve Your Client ID and Client Secret
After creating the OAuth client, Google will display a credential summary containing your Client ID.
Google Cloud Console generates the OAuth Client ID for your WordPress connection.
Click Done.
Next, navigate to:
Google Auth Platform > Clients
Open the OAuth client you created.
On the client details page, locate the Client ID and Client Secret information.
Depending on the current Google Cloud interface, you may need to create or access an available client secret.
Copy both values carefully.
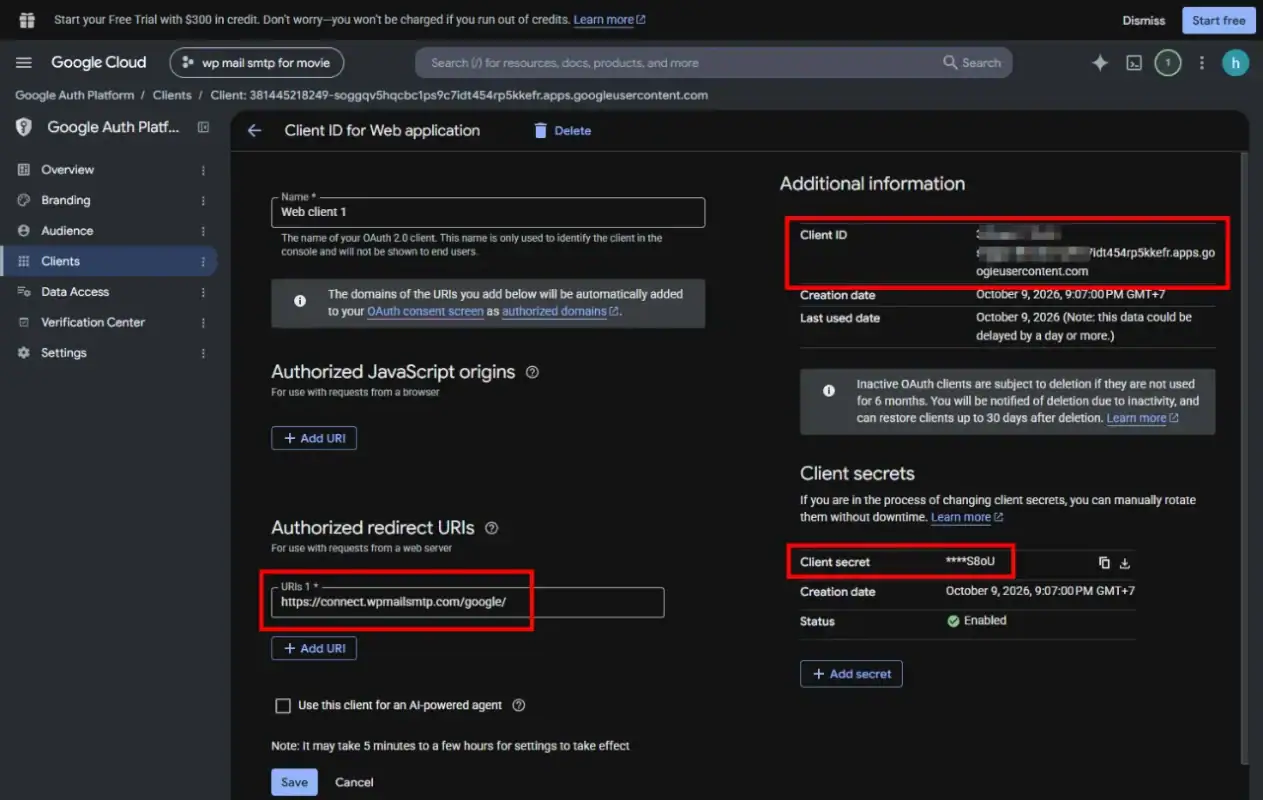
Security note: Never publish your actual Client Secret or share a downloaded OAuth credentials JSON file publicly.
Step 8: Update Your Google OAuth Publishing Status
Before authorizing WordPress, review your application’s publishing status. Go to: Google Auth Platform > Audience For a personal Gmail account, the application will generally use the External user type. New applications may initially have a Testing publishing status. For ongoing use, complete the required application configuration and select Publish App to move the application to In production, where available. This is important because OAuth refresh tokens issued to external applications in Testing may expire after seven days when Gmail permissions are requested. An application in Testing can also restrict authorization to registered test users. Google Workspace applications configured for Internal use have different audience restrictions. Depending on your application configuration and requested scopes, Google may show an unverified application warning or require additional verification. For an application intended only for personal use, Google provides limited-use exceptions to the verification process. Public applications serving broader audiences may have different requirements. Make sure you understand these restrictions before connecting a production website.
Step 9: Connect WP Mail SMTP to Your Google Account
Return to the WordPress dashboard and open: WP Mail SMTP > Settings > General Scroll to the Google / Gmail configuration section. Paste the OAuth credentials into their corresponding fields:
- Client ID: Your Google OAuth Client ID
- Client Secret: Your Google OAuth Client Secret
Click Save Settings. After saving, the Authorization section should display a button labeled: Allow plugin to send emails using your Google account
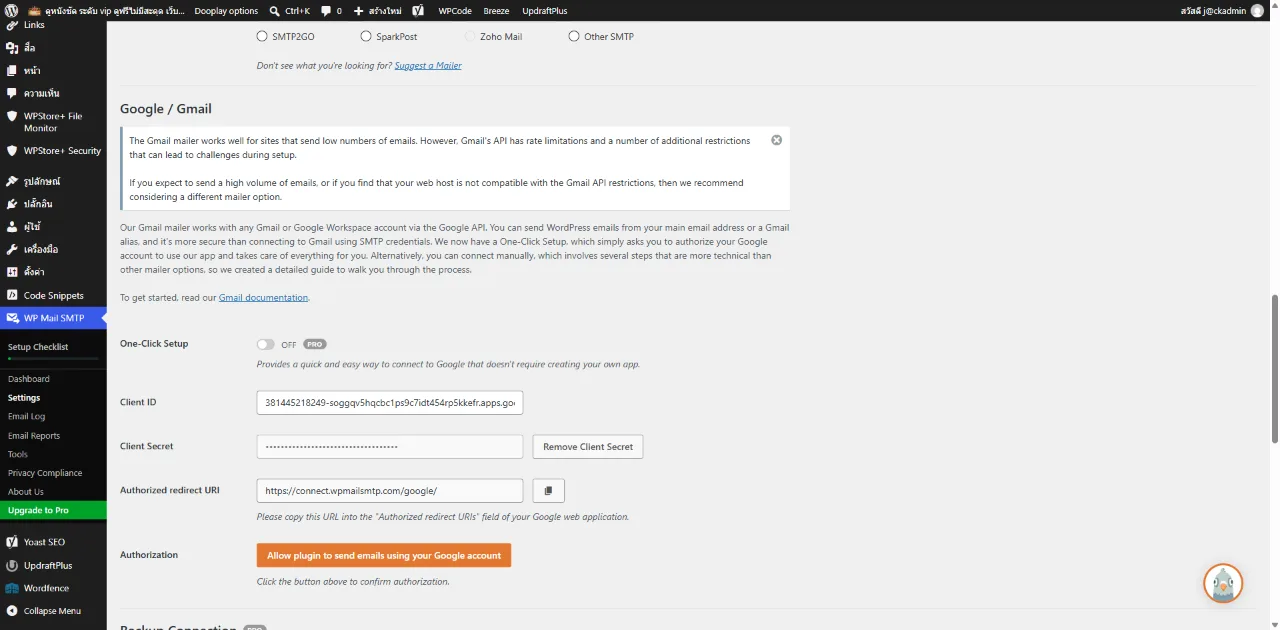
Google will open a sign-in window. Select the Gmail or Google Workspace account that you want to use. If Google displays an unverified application warning, verify that the OAuth application belongs to the Google Cloud project you created and that the requested permissions are expected. Only proceed if you trust the application and understand the access being requested. Google may then display a permission request showing the Gmail access associated with your OAuth application.
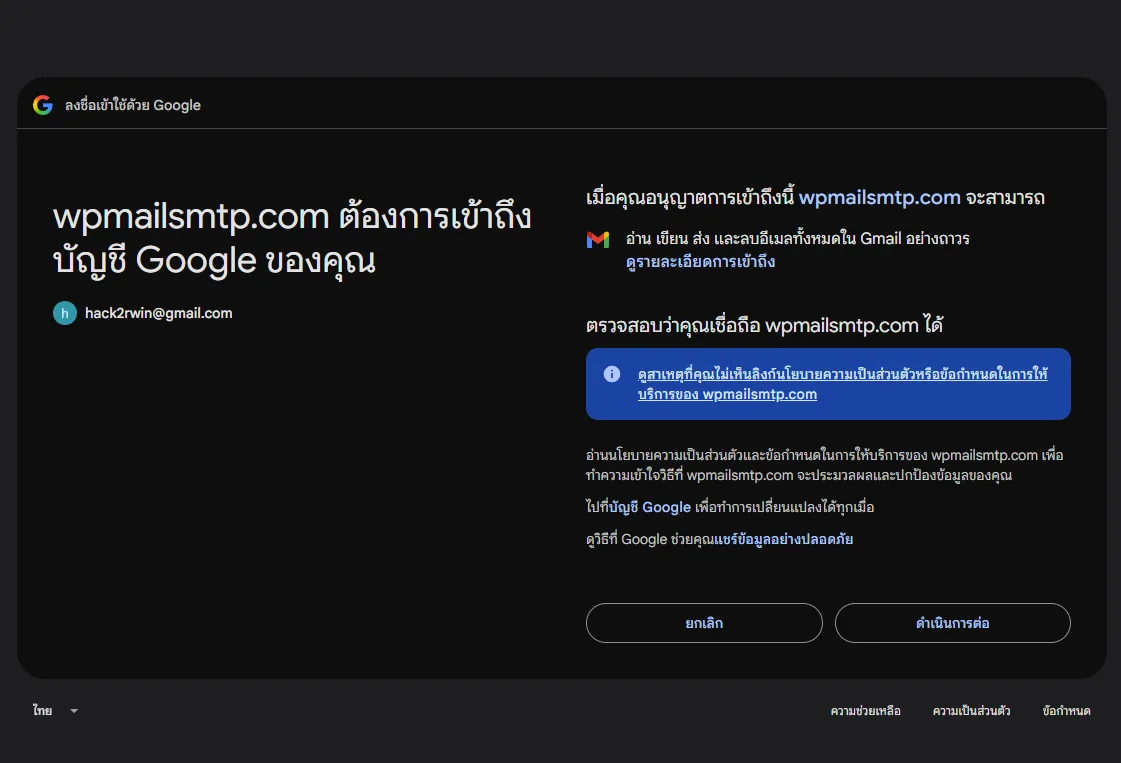
Carefully review the requested permissions and continue only if they match your intended configuration. After authorization, Google redirects you to your WordPress website. The WP Mail SMTP settings should now display an active OAuth connection.
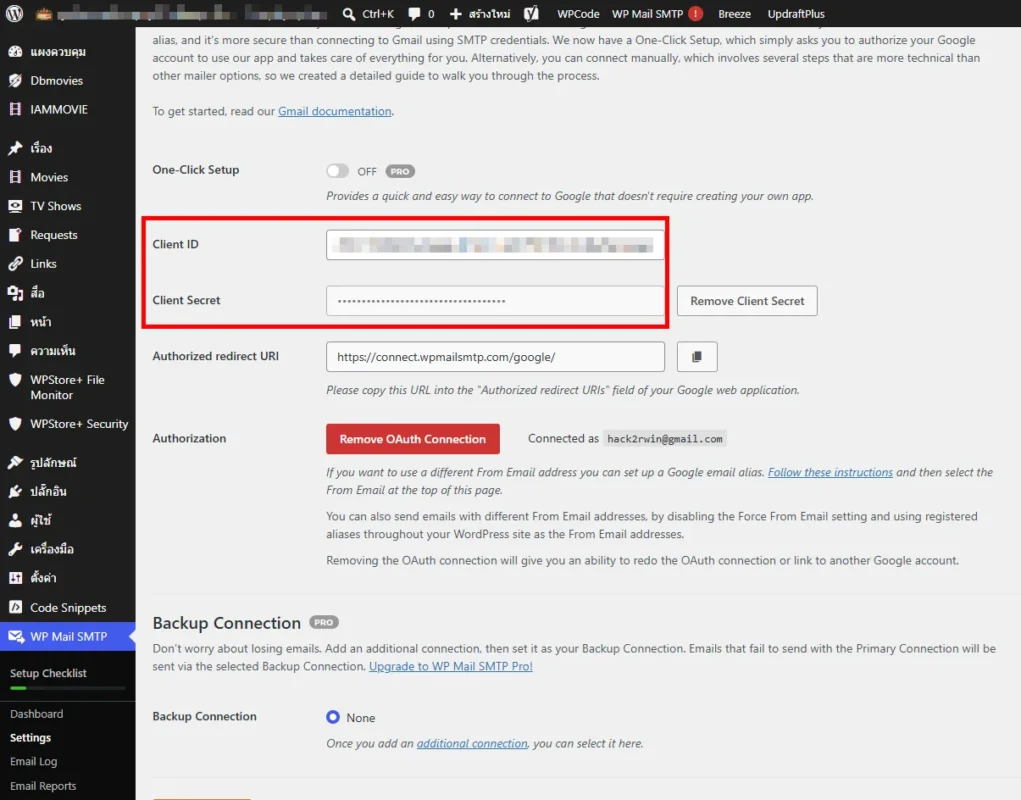
At this stage, your Gmail API connection is configured.
Step 10: Send a Test Email From WordPress
The final step is to confirm that WordPress can send an email successfully. Navigate to: WP Mail SMTP > Tools > Email Test Enter a recipient email address that you can access. Leave the HTML option enabled unless you specifically want to test plain-text delivery. Click Send Email. If the test succeeds, WP Mail SMTP should display a confirmation message. Next, open the recipient’s inbox and verify that the test email was delivered.
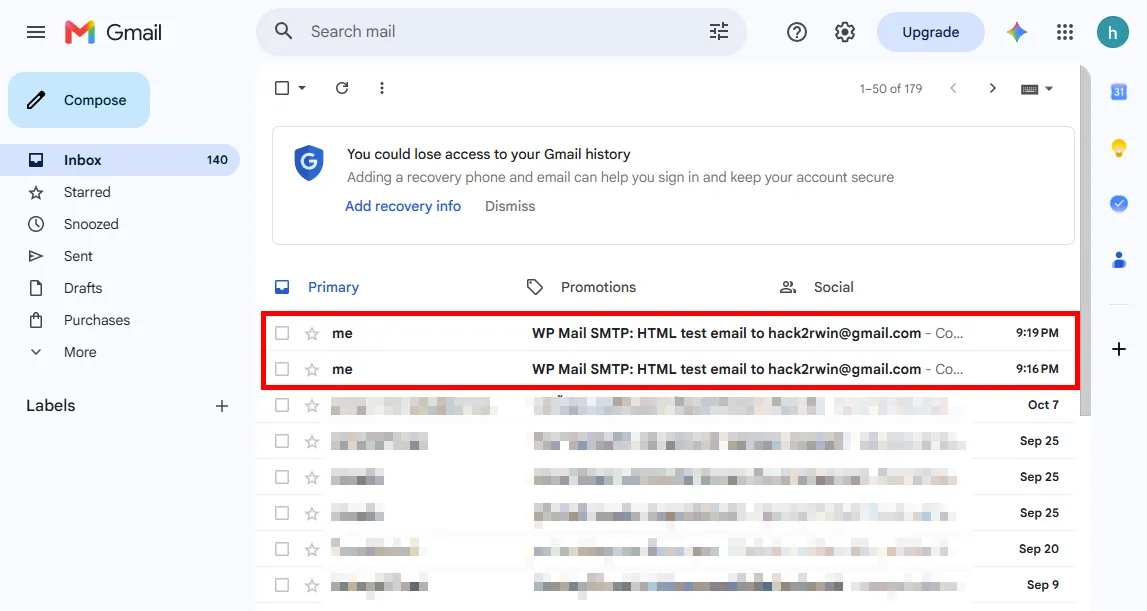
Receiving the test email confirms that your current configuration can send messages through the connected Gmail account. However, successful test delivery does not guarantee that every future email will avoid spam filtering. For WooCommerce websites, we also recommend testing actual order notifications and password reset emails.
Troubleshooting Common WP Mail SMTP Gmail API Errors
Even when following the setup process correctly, you may encounter Google OAuth or email delivery errors. Here are some common issues and recommended solutions.
Error 400: redirect_uri_mismatch
This error usually means that the redirect URI configured in Google Cloud Console does not exactly match the URI used by WP Mail SMTP.
Open your OAuth client configuration and verify the Authorized redirect URIs setting.
For the default WP Mail SMTP configuration, the URI is:
https://connect.wpmailsmtp.com/google/
Check for missing characters, extra spaces, or an incorrect trailing slash.
Error 401: invalid_client
This error may occur when the Client ID or Client Secret is incorrect. Confirm that both values belong to the same OAuth client and that the client still exists in your Google Cloud project. Update the credentials in WP Mail SMTP and save the settings again.
Error 403: access_denied
This may happen when your OAuth app is still in Testing and the Google account attempting to connect has not been registered as a test user. Check:
- Google Auth Platform > Audience
- Publishing status
- Test users
- Google Workspace organization restrictions
Correct the application access settings and try the authorization process again.
Google Hasn’t Verified This App
Google may display a warning when your OAuth application has not completed Google’s verification process. For a personal-use application that you created yourself, this warning may be expected. Before continuing, verify the application identity and review the permissions requested. Never bypass this warning for an unfamiliar application or one that you do not trust.
Error: invalid_grant
This error can occur when an OAuth token is expired, revoked, or otherwise invalid. Check the application’s publishing status and reconnect your Google account through WP Mail SMTP if necessary. If the connection stops working repeatedly after several days, confirm that your OAuth application is not still operating in Testing mode.
The Test Email Was Sent but Never Arrived
If WP Mail SMTP reports success but you cannot find the email, check the recipient’s Spam or Junk folder. Also verify the recipient address and the sending account. For websites sending from a custom domain through Google Workspace, review the domain’s SPF, DKIM, and DMARC configuration. Keep in mind that API authorization and successful email submission are only parts of the overall email delivery process.
Frequently Asked Questions
Can I use WP Mail SMTP with Gmail for free?
Yes. WP Mail SMTP Lite supports manually connecting Gmail API by creating your own Google Cloud project and OAuth credentials. The plugin’s automated One-Click Setup is a separate feature available with eligible paid licenses.
Do I need a paid Google Cloud account?
You can create a Google Cloud project and configure OAuth without automatically purchasing a paid cloud service. However, you should review Google Cloud billing requirements and the quotas for any services you enable. Gmail sending limits still apply to your Google account.
Is Gmail API better than traditional SMTP?
Gmail API uses OAuth 2.0 authentication and does not require storing your Google account password directly in WordPress. However, the best delivery method depends on your website’s sending volume, provider requirements, and hosting environment.
Can I use Gmail API for WooCommerce emails?
Yes. WP Mail SMTP can send WooCommerce-generated emails through its configured Gmail connection. For stores sending substantial volumes of transactional email, a dedicated email delivery service may be more appropriate.
Can I use Gmail aliases with WP Mail SMTP?
Yes, supported Gmail aliases can be used when properly configured in your Google account and WP Mail SMTP settings. If you need multiple sender addresses, review the Force From Email option before enabling it.
Will Gmail API prevent emails from going to spam?
No. Gmail API does not guarantee inbox placement. Email deliverability also depends on sender reputation, message content, recipient filtering, and domain authentication.
Do I need to reconnect after changing my Google password?
Changing your Google password may invalidate the existing OAuth connection. If email delivery stops, reauthorize the Google account in WP Mail SMTP.
Final Thoughts
Configuring WP Mail SMTP with Gmail API through Google Cloud Console is a practical way to send WordPress emails using Google’s OAuth 2.0 authentication. Although the manual setup process involves several steps, it gives website administrators direct control over their Google Cloud project, OAuth client, and sender authorization. By following this tutorial, you have learned how to enable Gmail API, create OAuth credentials, connect your Google account to WordPress, and verify email delivery. For WordPress websites and small WooCommerce stores, this configuration can be a useful solution for routine email notifications. Remember to review your Google OAuth application settings periodically and test email delivery after major WordPress, plugin, or account changes. For additional WordPress optimization, security, and website management solutions, explore the WordPress tools and plugins available at WPStore+. Official References
- WP Mail SMTP – Google Workspace / Gmail Mailer Setup
- Google Cloud Console
- Google OAuth Verification Requirements
- Google OAuth Verification Exceptions