
Knowledge, WordPress Troubleshooting
How to Fix WordPress Stuck in Maintenance Mode
Jul
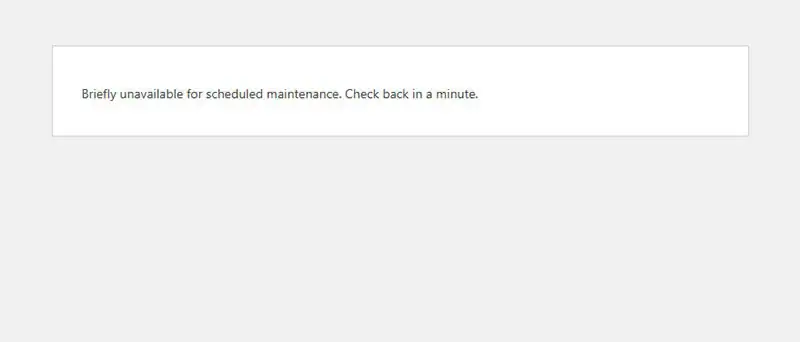
WordPress stuck in maintenance mode is a common problem that appears when a plugin, theme, or WordPress core update does not finish correctly. Visitors may see the message “Briefly unavailable for scheduled maintenance. Check back in a minute,” while the WordPress dashboard may also become inaccessible.
This guide explains how to exit maintenance mode safely, verify the interrupted update, test your website, and reduce the chance of the same issue happening again.
Why WordPress Gets Stuck in Maintenance Mode
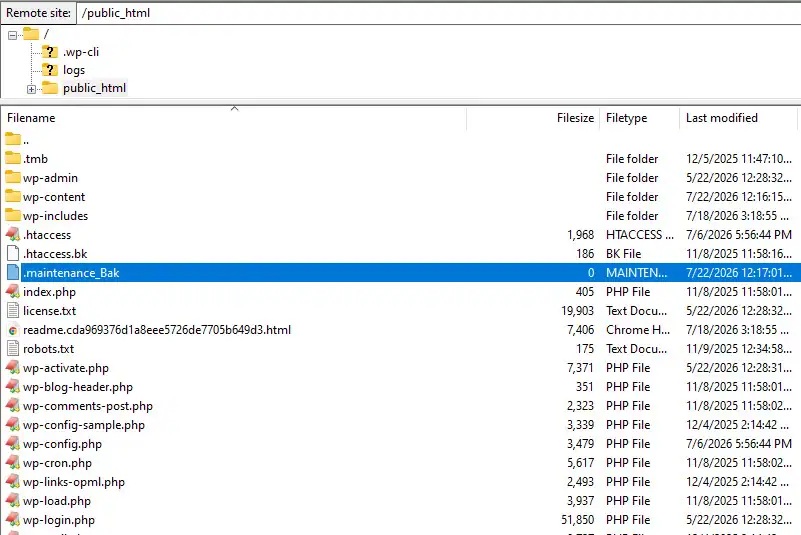
During an update, WordPress creates a temporary file named .maintenance in the root directory of the website. This file instructs WordPress to display a maintenance notice while files are being replaced.
WordPress normally deletes the file automatically when the update finishes. However, the file may remain after:
- A server timeout
- A lost internet connection
- Insufficient PHP memory
- Limited server execution time
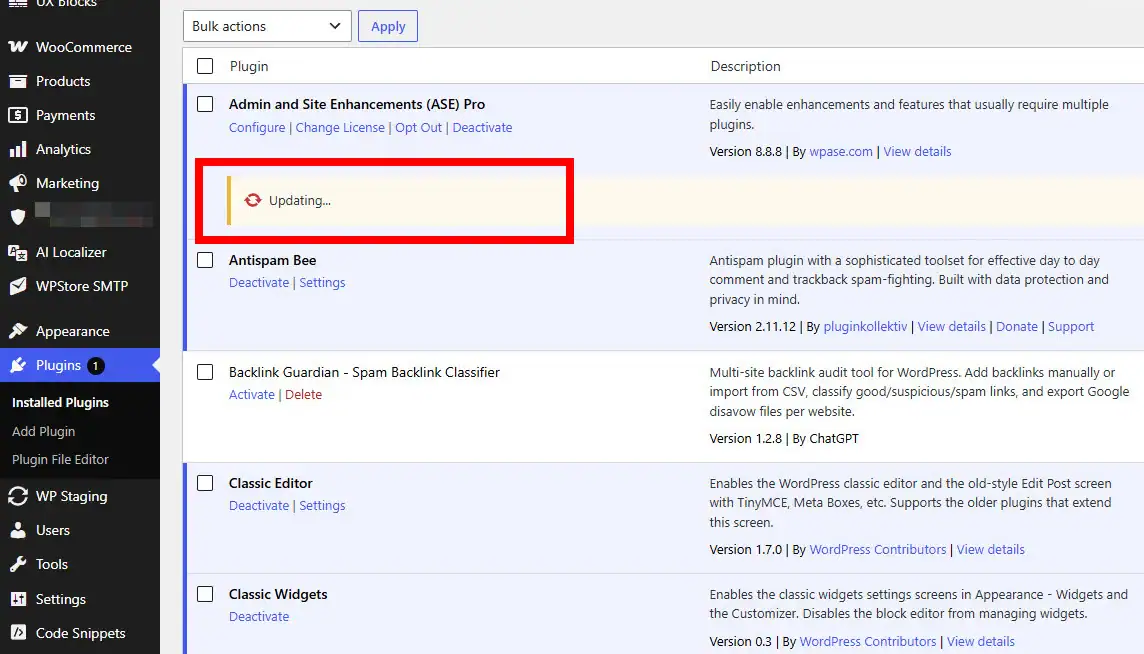
- A plugin or theme conflict
- Incorrect file permissions
- An interrupted update process
As long as the .maintenance file remains active, the website may continue displaying the maintenance message.
Before You Start
Wait a Few Minutes
A normal WordPress update may activate maintenance mode briefly. Wait approximately two to five minutes before making any changes.
Refresh the website in a private or incognito browser window. Avoid starting another update while the original process may still be running.
Create a Backup and Prepare File Access
Create a backup of the website files and database whenever possible. A backup provides a recovery point if another problem appears during troubleshooting.
You will also need access to the WordPress files through one of the following methods:
- Your hosting file manager
- FTP or SFTP
- SSH access
Enable hidden-file visibility because .maintenance begins with a dot and may not appear by default.
How to Fix WordPress Stuck in Maintenance Mode
Step 1: Open the WordPress Root Directory
Open the directory where WordPress is installed. Depending on your hosting provider, this directory may be named:
public_htmlwww- The name of your domain
- A custom installation folder
The correct directory should contain files and folders such as:
wp-adminwp-contentwp-includeswp-config.php
Step 2: Find the .maintenance File
Look for a file named:
.maintenance
If you cannot see it, enable the option to show hidden files in your hosting file manager or FTP application.
In cPanel File Manager, this option is commonly available under Settings > Show Hidden Files.
Step 3: Delete the .maintenance File
Delete only the .maintenance file. Do not delete WordPress folders, configuration files, or other core files.
After deleting the file, open the website in a private browser window and refresh the page. In many cases, both the website and WordPress dashboard will become available immediately.
Step 4: Check the Interrupted Update
Log in to WordPress and go to:
Dashboard > Updates
Check whether the affected plugin, theme, or WordPress core update completed successfully.
If the update is still pending, run it again one item at a time. Avoid updating several large plugins simultaneously, especially when using hosting with limited memory or execution time.
Step 5: Inspect the Affected Plugin or Theme
Open the Plugins or Themes screen and look for errors, missing files, or incomplete updates.
If necessary, download a fresh copy from the original developer or official source and reinstall it carefully.
For a premium plugin or theme, confirm that:
- The license is active
- The subscription has not expired
- The installation package is valid
- The package is compatible with your WordPress and PHP versions
If Deleting .maintenance Does Not Fix the Problem
Clear the browser cache, WordPress cache, hosting cache, and CDN cache. A cached maintenance page may remain visible even after the file has been removed.
Check the root directory again to confirm that .maintenance was not recreated. You should also review the server error log or WordPress debug log for:
- PHP memory errors
- Execution timeouts
- File permission problems
- Failed plugin updates
- Fatal PHP errors
If the problem started during a plugin update, temporarily rename that plugin’s folder through File Manager or FTP.
For example, rename:
plugin-name
to:
plugin-name-disabled
This disables the plugin without requiring dashboard access. Restore the original folder name only after confirming that the website loads correctly.
Testing the Plugin and Website After Recovery
After restoring access, complete the following checks before returning the website to normal operation:
- Open the homepage and several important pages.
- Log in to the WordPress dashboard.
- Check the Plugins, Themes, and Updates screens.
- Test contact forms, login pages, and important plugin features.
- For WooCommerce, test the cart and checkout process.
- Review Tools > Site Health for critical warnings.
- Clear all caches and test again in a private browser window.
If a particular plugin caused the problem, test its main functions carefully. A staging website is recommended for major updates or changes involving WooCommerce payments and checkout functionality.
How to Prevent Maintenance Mode Problems
Create a backup before running updates and update plugins or themes one at a time. This makes it easier to identify the cause if an update fails.
Keep WordPress, PHP, plugins, and themes supported and current. Use suitable PHP memory and execution time limits, maintain correct file permissions, and avoid closing the browser while an update is running.
For business or WooCommerce websites, test major updates on a staging environment before applying them to the live website.
FAQs
Is it safe to delete the .maintenance file?
Yes. WordPress creates this file temporarily during updates. If the update has stopped and the website remains unavailable, deleting it is the normal way to exit maintenance mode.
Will deleting the file remove my website content?
No. Deleting .maintenance does not remove posts, pages, products, media files, or settings. However, the interrupted update may still require repair or reinstallation.
Why can I not see the .maintenance file?
The file is usually hidden because its name begins with a dot. Enable hidden-file visibility in your hosting file manager or FTP application.
Can caching keep showing the maintenance message?
Yes. Clear every active cache layer, including WordPress, hosting, CDN, and browser caches.
Should I run all updates again immediately?
Run the affected update first. After confirming that it completes successfully, continue with the remaining updates one item at a time.
Summary
When WordPress is stuck in maintenance mode, the usual solution is to remove the hidden .maintenance file from the WordPress root directory.
After access returns, verify the interrupted update, clear active caches, inspect error logs, and test important website functions. Regular backups, staging tests, and one-at-a-time updates can help prevent the same issue from occurring again.
Call to Action
Explore the WPStore+ Knowledge Base for more practical WordPress troubleshooting guides and safe website recovery steps.