
Knowledge, WordPress Troubleshooting
How to Fix the “Memory Exhausted Error” by Increasing WordPress PHP Memory Limit
Jul
The WordPress PHP memory limit determines the server resources allocated to your website scripts. This documentation explains how to effectively resolve fatal memory exhausted errors to restore optimal site functionality.
Essential Steps for Resolving the Memory Error
When your website processes demanding tasks—such as processing large WooCommerce orders, regenerating image thumbnails, or running complex database queries—it requires sufficient server memory. If a script exhausts the default allocated memory, WordPress will display a fatal error message. To resolve this, you must manually adjust your server configuration files to increase the available memory capacity.
Preparing for Configuration Changes 🔐
Before altering any core WordPress files, it is mandatory to safeguard your website data. Minor syntax errors in critical files can cause site-wide crashes.
-
Create a Full Backup: Use a reliable backup plugin or your hosting control panel to back up your database and all website directories.
-
Use a Proper FTP Client: Download and install an FTP client (such as FileZilla) or utilize the File Manager application provided in your web hosting control panel (like cPanel or DirectAdmin).
-
Use a Plain Text Editor: Always edit configuration files using code editors like VS Code, Notepad++, or Sublime Text. Never use rich text editors like Microsoft Word, as they inject hidden formatting characters that will break your website.
Method 1: Editing the wp-config.php File (Recommended)
The safest and most common method to increase your memory limit is by modifying the primary WordPress configuration file.
-
Connect to your website server using your FTP client or hosting File Manager.
-
Navigate to the root directory of your WordPress installation (usually
public_htmlorwww). -
Locate the file named
wp-config.php. -
Right-click the file and select Edit.
-
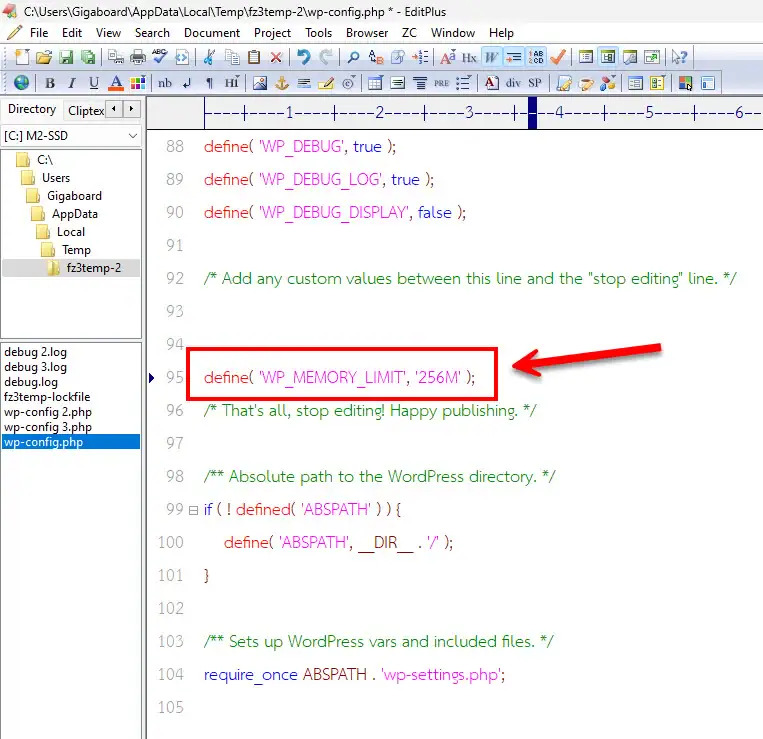
Scroll down to find the line that says:
/* That's all, stop editing! Happy publishing. */. -
Just above that specific line, paste the following code:
PHP
define( 'WP_MEMORY_LIMIT', '256M' );
-
Save your changes and upload the modified file back to your server. Refresh your website to see if the error is resolved.
Method 2: Updating the php.ini File
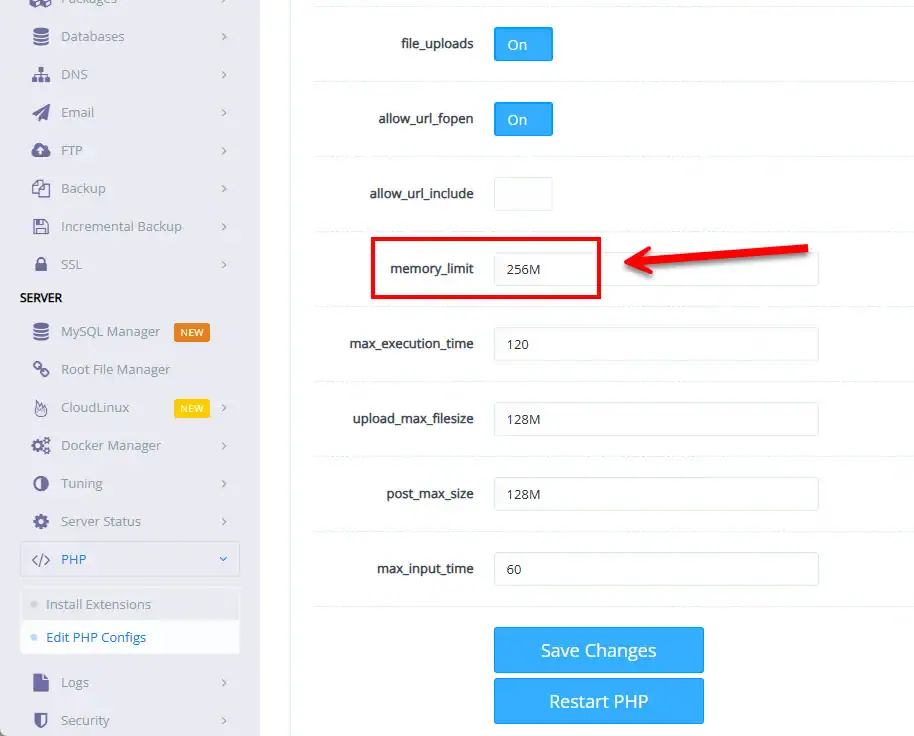
If editing the wp-config.php file does not resolve the issue, your server environment might require adjustments at the PHP configuration level. This is highly common for users on Virtual Private Servers (VPS) or dedicated hosting.
-
Access your hosting control panel (cPanel).
-
Look for a tool named MultiPHP INI Editor or PHP Configuration.
-
Select your website domain from the dropdown menu.
-
Locate the directive labeled
memory_limit. -
Change the existing value to
256Mor512M(if your hosting plan permits). -
Click Apply or Save Changes.
If you must do this manually via FTP, look for a file named php.ini in your root directory and add the following line:
Ini, TOML
memory_limit = 256M
Method 3: Modifying the .htaccess File
As a secondary fallback, you can attempt to increase the PHP memory limit by modifying the hidden server configuration file utilized by Apache web servers.
-
Access your WordPress root directory via FTP or File Manager. Ensure that you have enabled the option to “Show Hidden Files” in your settings, as
.htaccessis a hidden file. -
Open the
.htaccessfile for editing. -
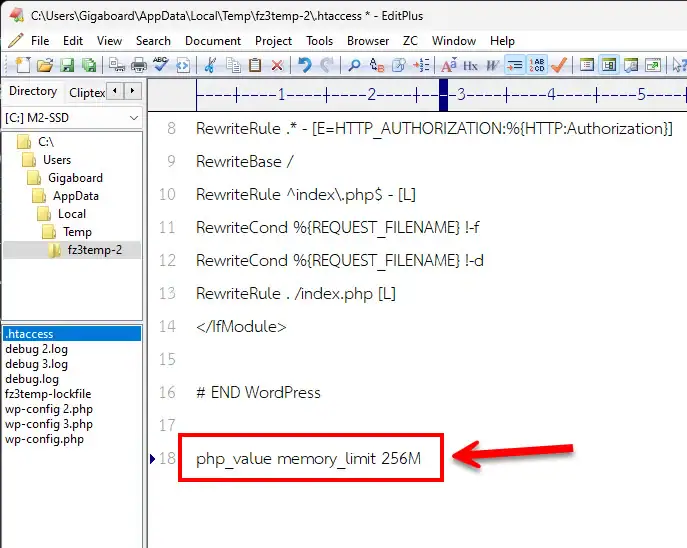
Add the following directive at the very bottom of the file:
Apache
php_value memory_limit 256M
-
Save the file. Caution: If your website immediately displays an Internal Server Error (Error 500) after saving, your server does not support this method. Revert the change immediately by deleting the line you just added.
Testing the Plugin and Configuration ✅
Once you have applied the memory limit increase, you must test your configuration to ensure the system recognizes the new parameters and that your plugins function properly without triggering the fatal error.
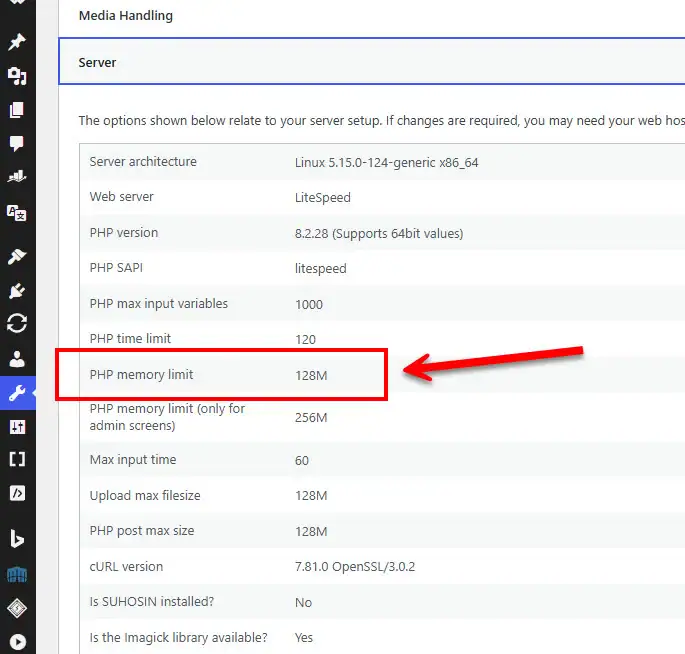
Step 1: Verifying the Memory Limit Increase You can confirm that WordPress acknowledges your new limit directly from the administrative dashboard.
-
Navigate to Tools > Site Health in your WordPress sidebar menu.
-
Click on the Info tab at the top of the screen.
-
Scroll down and expand the Server section.
-
Look for the PHP memory limit entry. It should now reflect the value you established (e.g., 256M).
Step 2: Testing the Plugin Functionality If a specific plugin triggered the memory exhaustion error upon activation or during a specific automated task, you must test it now.
-
Go to Plugins > Installed Plugins.
-
Activate the specific plugin that previously caused the crash.
-
Execute the heavy task that failed previously (such as running a large product import in WooCommerce or utilizing a heavy page builder).
-
If the task completes successfully without displaying a blank white screen or a fatal error message, your configuration test is successful.
FAQs 💬
What is the recommended PHP memory limit for a WordPress site? For standard blogs or simple portfolio websites, 128M is generally sufficient. However, if you are running an e-commerce platform using WooCommerce, or utilizing heavy page builders, a minimum of 256M is highly recommended. Complex enterprise-level sites may require 512M.
Why did my memory limit exhaust suddenly? Memory errors typically occur after you install a new plugin, update an existing theme, or attempt to process a massive amount of data at once (like a bulk product upload). Some poorly optimized plugins can also cause “memory leaks,” steadily consuming resources over time until the limit is breached.
What is the difference between WP_MEMORY_LIMIT and WP_MAX_MEMORY_LIMIT? WP_MEMORY_LIMIT dictates the memory available for the frontend of your website (what your visitors see). WP_MAX_MEMORY_LIMIT controls the memory available for the WordPress backend (the admin dashboard), which often requires more resources to run background updates and heavy administrative tasks.
I increased the memory limit in all files, but the error remains. What should I do? If you have applied the methods above and the error persists, your hosting provider has likely implemented a hard cap on server resources at the infrastructure level. You will need to contact their technical support team and request that they manually increase the PHP memory limit for your hosting environment.
Summary
Resolving the memory exhausted error is a fundamental troubleshooting skill for managing a healthy WordPress environment. By safely increasing the WordPress PHP memory limit via the wp-config.php, php.ini, or .htaccess files, you provide your server with the necessary operational capacity to run complex scripts, powerful plugins, and demanding e-commerce functions smoothly. Always remember to verify your updated configurations through the WordPress Site Health tool and maintain regular backups before editing core files. Ensure your hosting plan adequately supports the technical demands of your growing digital business.
Need further assistance optimizing your website? Explore our premium, highly optimized plugins at WPStore+ or contact our professional support team for expert technical help.