
Knowledge, WordPress Troubleshooting
How to Fix the “Update Failed” Error When Updating WordPress
Jul
The WordPress update failed error is a common yet highly disruptive issue that can prevent you from accessing the latest security patches, feature enhancements, and performance improvements for your plugins, themes, or core software. This error typically occurs due to server timeouts, incorrect file permissions, or an interrupted download process that leaves your website stuck in a temporary state. When the automated update system fails, relying on the standard dashboard updater is no longer a viable option. Instead, administrators must utilize a manual update approach to overwrite the corrupted files, reactivate their configurations, and restore standard operations. This comprehensive guide will walk you through the essential steps to resolve the update failure, from manually downloading the necessary files to activating your license and verifying your basic settings.
Getting Started: Resolving the Error via Manual Installation
When an automatic update fails, the safest and most effective method to resolve the issue is to bypass the WordPress dashboard and perform a manual installation. This process ensures that all corrupted or incomplete files are completely replaced with clean, properly formatted data. The following steps detail the complete workflow for downloading, installing, and configuring your software to bypass the update error.
Downloading the Latest Files
The first step in resolving the update failure is to acquire a clean copy of the software you are attempting to update.
-
Navigate to the official WPStore+ dashboard or the designated repository where your plugin or theme is hosted.
-
Locate the specific product and download the latest stable version. The file will be provided in a compressed
.zipformat. -
Ensure that your download completes without interruption, as a corrupted
.ziparchive will result in further installation errors. Save this file to a readily accessible location on your local computer and extract the folder, as you will need the uncompressed files for the next step.
Installing and Uploading via FTP or File Manager
Once you have the extracted files, you must upload them directly to your website’s server, replacing the old, failing version.
-
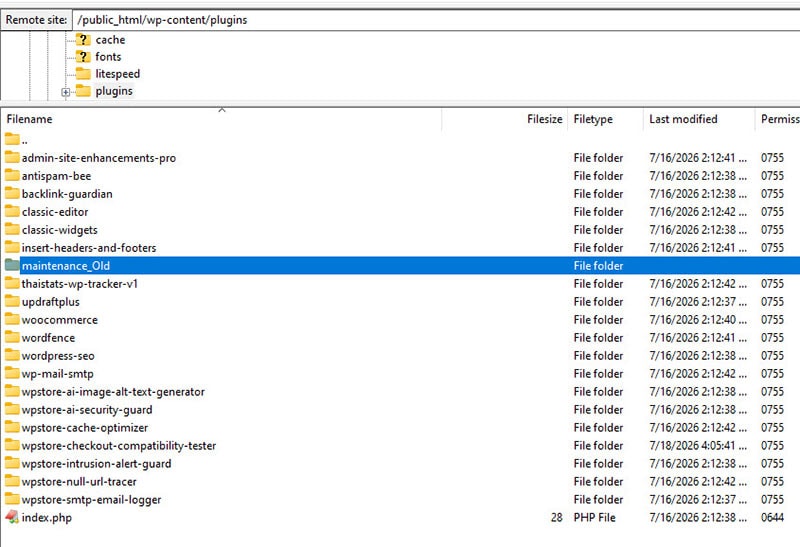
Connect to your website server using a reliable FTP client (such as FileZilla) or the File Manager provided in your hosting control panel (cPanel).
-
Navigate to the specific directory for the failing software. For plugins, this will be
wp-content/plugins/. -
Before uploading the new folder, it is highly recommended to rename the existing, outdated folder (for example, change
your-plugintoyour-plugin-old). This preserves your previous data in case you need to revert. -
Upload the newly extracted folder from your local computer into the
pluginsdirectory. Ensure that the transfer completes fully; incomplete transfers are a primary cause of ongoing errors. Once the upload is successful, you may safely delete the-oldfolder.
Activating the License and Verifying Basic Settings
After manually uploading the fresh files, you must ensure the software is properly recognized and authenticated by your WordPress environment.
-
Log into your WordPress administrative dashboard and navigate to the Plugins menu.
-
Locate the newly updated plugin and click Activate.
-
Because you performed a manual file replacement, the plugin may require you to re-validate your license key. Navigate to the plugin’s dedicated settings page and enter your WPStore+ license key to unlock premium features and enable future automatic updates.
-
Review your basic settings. Fortunately, manual file replacements do not erase the configurations stored in your WordPress database, but it is always best practice to verify that your custom layouts, integration keys, and display preferences remain intact and functional.
Crucial Precaution: Checking File Permissions and Maintenance Mode
If the automated update failed initially, it is highly likely that your server environment has underlying configuration issues that need to be addressed.
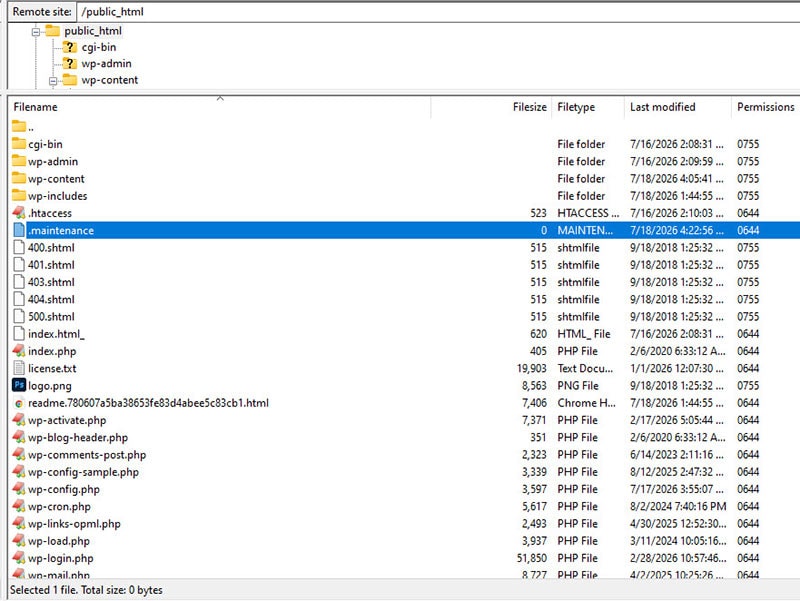
-
The
.maintenanceFile: When an update begins, WordPress creates a.maintenancefile in your root directory. If the update fails, this file often remains, locking you and your visitors out of the site. Access your root directory via FTP and delete this file to restore access. -
File Permissions: Incorrect permissions will block WordPress from writing new files. Ensure that your folder permissions are set to
755and your file permissions are set to644. Correcting these permissions will often prevent the “Update Failed” error from occurring during future updates. 🔐
Testing the Plugin and Update Stability
After completing the manual installation and configuration, thorough testing is mandatory to ensure the error has been fully eradicated and the software is performing optimally.
Begin by enabling the WordPress debugging mode (WP_DEBUG) in your wp-config.php file to monitor any hidden PHP errors or conflicts that might not be immediately visible on the front end. Navigate through the specific features of the updated plugin. If it is an e-commerce tool, run a test transaction; if it is a design plugin, attempt to create and save a new layout.
Additionally, check your website from an incognito browser window to ensure that the user-facing experience is smooth and free of broken assets. Testing guarantees that the manual intervention was successful and that your website’s database is communicating perfectly with the newly uploaded core files. ✅
FAQs
💬 Why did the “Update Failed” error happen in the first place? This error is most commonly caused by a server timeout. If your hosting server takes too long to respond while downloading or unzipping the update package, WordPress aborts the process to protect the site, resulting in a failure. It can also be caused by strict server firewalls or incorrect file ownership permissions.
💬 Will I lose my settings or data by performing a manual update? No. WordPress stores your content, pages, and plugin settings inside the MySQL database, not within the plugin files themselves. When you delete the old plugin folder and upload a new one via FTP, you are only refreshing the core executable files. Your database remains untouched, and your settings will automatically apply to the new files once activated.
💬 What should I do if my site is completely blank after a failed update? A blank screen (often called the White Screen of Death) usually means a fatal PHP error occurred during the failed update. You should immediately access your server via FTP, navigate to the wp-content/plugins/ directory, and rename the folder of the plugin that was updating. This forces WordPress to deactivate it, restoring your access to the dashboard where you can begin the manual installation process.
💬 Do I need to re-enter my license key every time I update manually? In most cases, no. The license key is saved in your database alongside your other settings. However, major version jumps or specific security resets by the plugin developer might occasionally require you to re-validate the license to ensure the domain is still authorized.
Summary
for WordPress update failed error
Resolving the WordPress update failed error is a straightforward process when approached methodically. While encountering an update failure can be frustrating, bypassing the automated system in favor of a manual installation ensures that your website receives the necessary files without risking data corruption. By carefully downloading the official software, transferring the files via FTP, validating your license, and double-checking your server permissions, you can bypass temporary server glitches and maintain a secure, high-performing website. Always remember to test your site thoroughly after any manual intervention to guarantee long-term stability and optimal functionality for your visitors.
Mastering WordPress and resolving technical issues doesn’t have to be overwhelming. If you found this troubleshooting guide helpful and want to explore more step-by-step tutorials, we have plenty of resources waiting for you. Click here to return to our main [Knowledge Base] to discover more guides tailored for your website’s success. However, if you are a WordPress beginner and feel uncomfortable modifying server files or performing manual updates on your own, you don’t have to struggle alone. You can always reach out to our dedicated WPStore+ Support team. Our experts are ready to step in and fix the issue for you, ensuring your website gets back online quickly and safely!