
Knowledge, WordPress Security
How to Protect WordPress wp-admin and wp-login.php with Cloudflare WAF
Jul
Cloudflare WAF for WordPress helps website owners reduce unwanted access attempts to sensitive WordPress admin areas such as /wp-admin/ and /wp-login.php. This guide explains how to create a practical Cloudflare security setup for WordPress login protection, using WAF Custom Rules and basic Rate Limiting in a safe and beginner-friendly way.
For many WordPress websites, the login page is one of the most common targets for bots, automated scanners, and brute-force attempts. By placing Cloudflare in front of your website, you can challenge or block suspicious requests before they reach your hosting server. This can help reduce server load and improve the overall security posture of your WordPress site.
Getting Started with Cloudflare WordPress Login Protection
Before creating security rules, make sure your domain is already connected to Cloudflare and that your DNS record is proxied through Cloudflare. In the Cloudflare dashboard, proxied records usually show the orange cloud icon. If your website traffic does not pass through Cloudflare, WAF and Rate Limiting rules will not be applied.
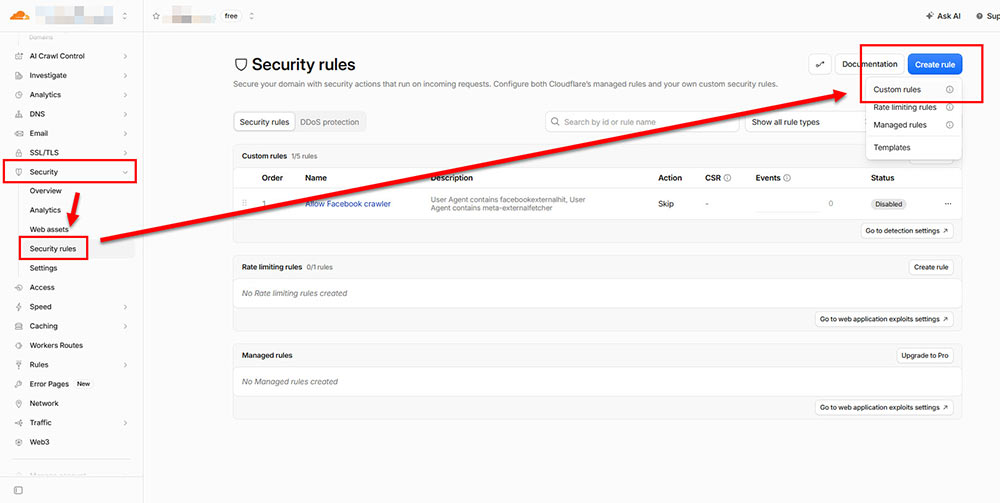
Step 1: Open the Cloudflare WAF Rules Area
Log in to your Cloudflare dashboard and choose the domain you want to protect. Then go to:
Security → WAF → Custom Rules → Create Rule
This section allows you to create conditions for incoming requests and choose what action Cloudflare should take when those conditions are matched.
Step 2: Create a Rule for wp-login.php and wp-admin
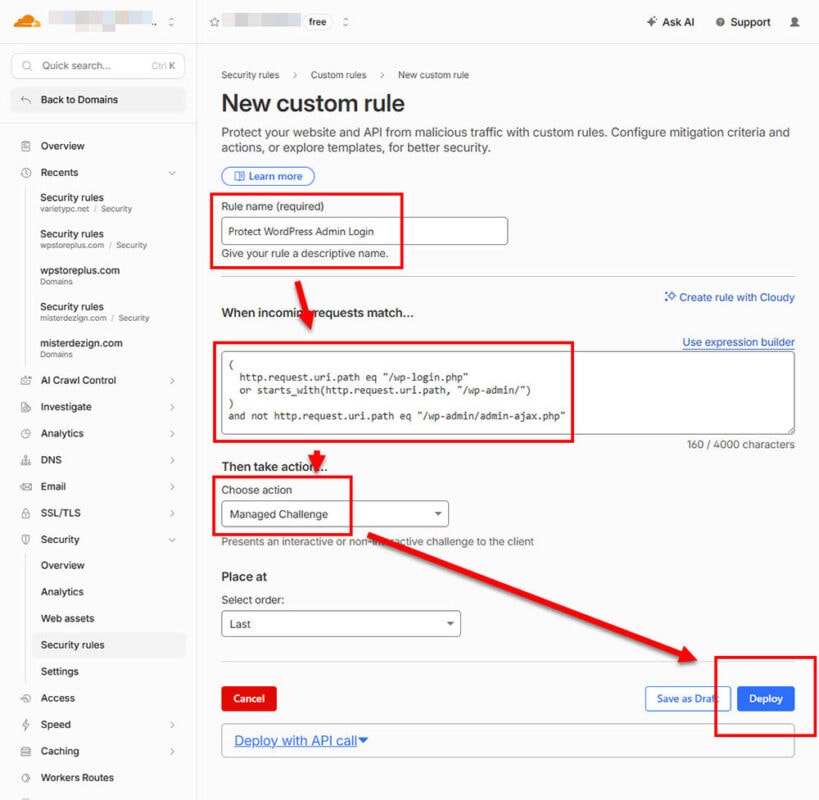
Create a new rule with a clear name such as:
Protect WordPress Admin Login
Use this expression:
(
  http.request.uri.path eq "/wp-login.php"
  or starts_with(http.request.uri.path, "/wp-admin/")
)
and not http.request.uri.path eq "/wp-admin/admin-ajax.php"
This rule targets both the WordPress login page and the admin directory. The exception for /wp-admin/admin-ajax.php is important because many WordPress themes and plugins use this file for AJAX requests on the front end of the website.
Step 3: Choose the Recommended Action
For most WordPress websites, the recommended action is:
Managed Challenge
Managed Challenge allows Cloudflare to evaluate the request and challenge suspicious visitors without immediately blocking everyone. This is safer than using a strict Block action, especially if you are still testing your website or if multiple administrators need to log in.
Step 4: Use IP Allowlisting for Higher Security
If you have a fixed office IP address or a static home IP address, you may create a stricter rule that only allows known IP addresses to access the admin area. However, this should be used carefully. If your IP changes frequently, you may accidentally block yourself from accessing WordPress.
A basic example would be:
(
  http.request.uri.path eq "/wp-login.php"
  or starts_with(http.request.uri.path, "/wp-admin/")
)
and not http.request.uri.path eq "/wp-admin/admin-ajax.php"
and ip.src ne 123.123.123.123
Then choose:
Block
Replace 123.123.123.123 with your real IP address.
Step 5: Add Basic Rate Limiting for Login Attempts
Next, go to:
Security → WAF → Rate Limiting Rules → Create Rule
Create a rule for login form submissions only:
http.request.uri.path eq "/wp-login.php"
and http.request.method eq "POST"
This targets actual login attempts, because WordPress sends login credentials using the POST method.
If your Cloudflare plan only shows a 10-second Period, that is acceptable. A practical starting point is:
Requests: 10
Period: 10 seconds
Action: Block
Duration: 10 seconds
Characteristics: IP
If you still see heavy login abuse in Cloudflare Security Events, you may reduce the threshold to:
Requests: 5
Period: 10 seconds
Start with a moderate setting first. Setting the limit too low may temporarily block real administrators who enter the wrong password several times.
Step 6: Consider Blocking xmlrpc.php
If your website does not use Jetpack, the WordPress mobile app, or external publishing tools, you may also block /xmlrpc.php, which is often targeted by bots.
Expression:
http.request.uri.path eq "/xmlrpc.php"Action:
Block
If your website depends on XML-RPC features, do not block this file until you confirm it is safe.
Testing the Plugin
Although this setup is configured in Cloudflare rather than inside a WordPress plugin, you should still test it carefully before relying on it for live protection.
First, open your website homepage in a normal browser window and confirm that the page loads correctly. Then test important features such as contact forms, WooCommerce cart actions, checkout pages, search forms, and any dynamic buttons.
Next, open /wp-login.php and confirm that Cloudflare shows a challenge or allows access as expected. After passing the challenge, try logging in to WordPress normally.
Finally, review:
Cloudflare → Security → Events
Check whether suspicious traffic is being challenged or blocked. Look for repeated requests to /wp-login.php, /wp-admin/, or /xmlrpc.php. This helps confirm whether your rules are working as intended.
FAQs
Should I block the entire wp-admin folder?
Not always. You should exclude /wp-admin/admin-ajax.php because WordPress plugins and themes may use it for normal front-end functionality.
Is Managed Challenge better than Block?
For most websites, yes. Managed Challenge is safer when you are still testing because it reduces the chance of blocking real users or administrators.
What if Cloudflare Rate Limiting only allows Block and 10 seconds?
That is still useful. Use it as an additional protection layer against rapid login attempts. A setting such as 10 requests per 10 seconds per IP is a reasonable starting point.
Can I allow only my own IP address?
Yes, but only if your IP address is stable. If your internet provider changes your IP often, IP-only access rules may lock you out.
Should I also use a WordPress security plugin?
Yes, Cloudflare and a WordPress security plugin can work together. Cloudflare helps filter traffic before it reaches your server, while a WordPress security plugin can help monitor login activity inside WordPress.
Summary
Protecting /wp-admin/ and /wp-login.php with Cloudflare WAF is a practical way to reduce unwanted WordPress login traffic. A safe setup should include a Managed Challenge rule for the WordPress admin area, an exception for admin-ajax.php, and a basic Rate Limiting rule for POST requests to /wp-login.php.
For most WordPress website owners, this approach provides a balanced level of protection without being too aggressive. After enabling the rules, always test your website carefully and review Cloudflare Security Events to confirm that the protection is working correctly.
Need help securing your WordPress website? Review your Cloudflare rules carefully, test your login page, and keep your WordPress security settings updated.