
Knowledge, WordPress Troubleshooting
How to Fix the “Too Many Redirects” Error in WordPress
Sep
The Fix “Too Many Redirects” WordPress process requires identifying the underlying conflict causing your website to load in an infinite redirection loop. Often displayed in browsers such as Google Chrome as ERR_TOO_MANY_REDIRECTS, this error occurs when a browser requests a page, and the server continuously redirects the request back and forth between different URLs without delivering the destination page. For instance, your server may continually bounce visitors between the HTTP and HTTPS versions, or between the non-WWW and WWW versions of your domain name. Because modern web browsers detect this circular chain after several failed attempts, they terminate the connection automatically to prevent excessive bandwidth consumption and system crashes.
Understanding how to diagnose and resolve this issue is essential for any website owner, as a redirect loop takes your entire front end offline, preventing customers from accessing your content or completing purchases. While the error screen may appear intimidating, the root causes are generally straightforward: misconfigured WordPress Address and Site Address values, outdated browser or server cache, faulty SSL configuration rules, corrupted .htaccess directives, or misbehaving redirect and security plugins.
This technical guide offers a structured, step-by-step approach designed to help you resolve the redirect loop quickly and safely. Whether you retain access to your WordPress administration dashboard or are completely locked out, following these verified troubleshooting procedures will enable you to pinpoint the exact configuration error, re-establish stable server-to-browser communications, and implement preventive measures to ensure uninterrupted site uptime across all visitor requests.
Primary Troubleshooting Steps
Resolving this redirection conflict involves systematically checking each potential failure point. Follow these procedural methods in order, beginning with standard configuration checks and advancing to file-level adjustments if you cannot access the WordPress dashboard.
Step 1: Verify Site URL and Home URL Configurations
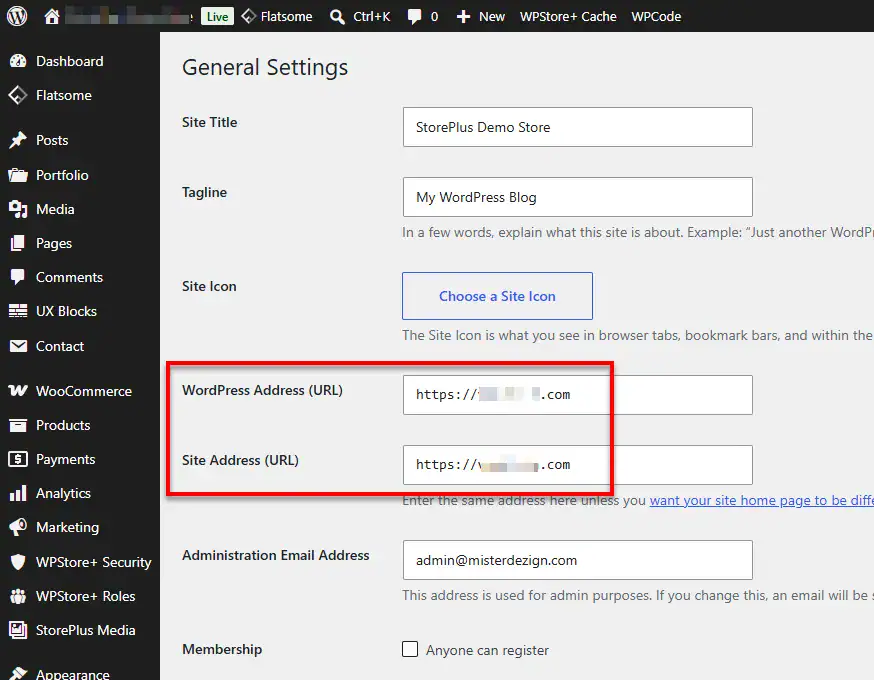
A mismatched WordPress Address (URL) and Site Address (URL) is the most frequent trigger of redirect loops. This often occurs after migrating domains, updating SSL certificates, or toggling between WWW and non-WWW prefixes.
-
Via the Dashboard (If accessible):
-
Navigate to Settings > General.
-
Locate WordPress Address (URL) and Site Address (URL).
-
Ensure both fields match exactly. Pay close attention to the protocol (
http://vs.https://) and the domain structure (e.g.,[https://example.com](https://example.com)vs.[https://www.example.com](https://www.example.com)). -
Ensure there are no trailing slashes at the end of the URLs.
-
Click Save Changes.
-
-
Via wp-config.php (If locked out of the dashboard):
-
Connect to your server using an FTP client (such as FileZilla) or your hosting control panel’s File Manager.
-
Locate the
wp-config.phpfile in your WordPress root directory. -
Download a backup copy to your local machine before making edits.
-
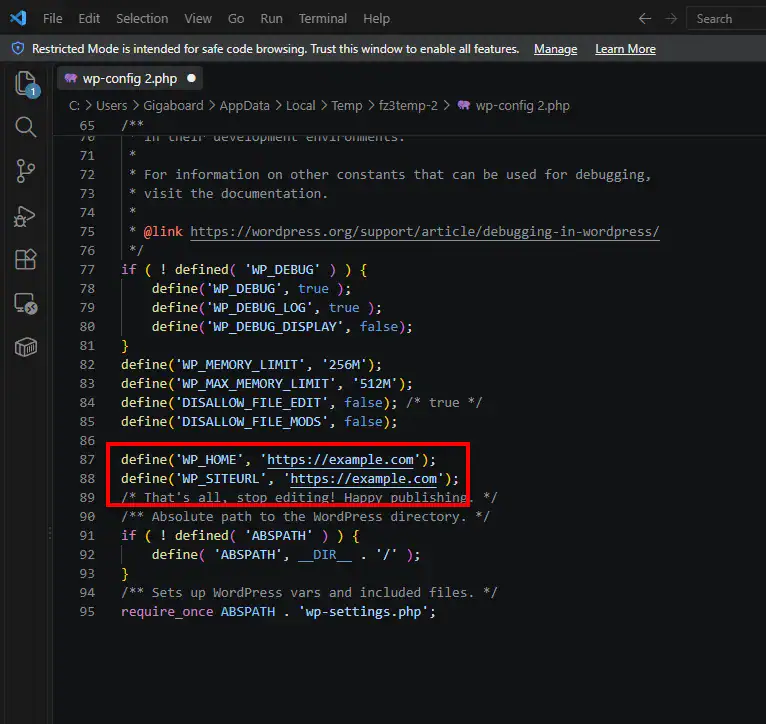
Open the file in a code editor and add the following lines right above the line that reads
/* That's all, stop editing! Happy publishing. */:PHP
define('WP_HOME', 'https://example.com');
define('WP_SITEURL', 'https://example.com');
(Replace
[https://example.com](https://example.com)with your precise website URL). -
Save the file and re-upload it to your root directory.
-
Step 2: Clear Browser, Server, and CDN Caching
Outdated cached redirects stored in your browser or edge servers can cause the error to persist even after the underlying configuration has been corrected.
-
Clear Browser Cache: Open your browser’s history or privacy settings and clear all cached files, cookies, and site data for your domain. Alternatively, test the URL inside an incognito or private window.
-
Clear Object & Page Cache: If you utilize server-level caching tools (e.g., Redis, Memcached, or hosting-provided varnish cache), purge all caches via your hosting control panel.
-
Purge CDN Cache: If your site routes traffic through Cloudflare or another Content Delivery Network (CDN), access the CDN dashboard and select Purge Everything. In Cloudflare, also confirm that your SSL/TLS encryption mode is set to Full or Full (Strict) rather than Flexible, as the “Flexible” mode frequently creates redirect loops when an SSL certificate is already installed on the origin server.
Step 3: Deactivate Problematic Plugins
Corrupted caching plugins, redirection managers, or security extensions can override server rules and trigger endless redirects.
-
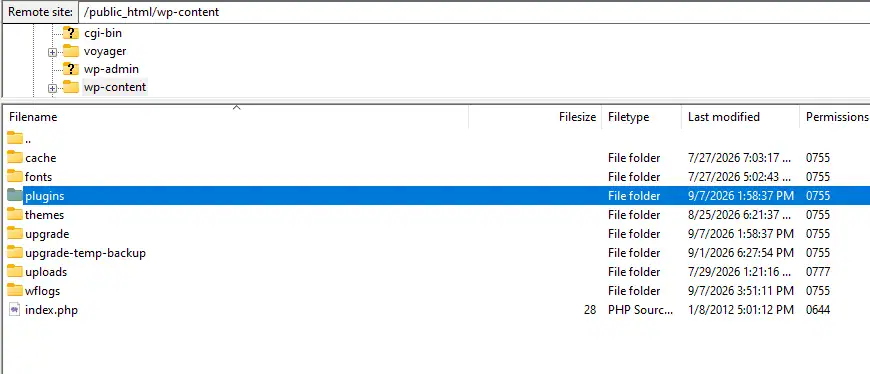
Connect to your website files via FTP with Filezilla Client or File Manager.
-
Navigate to the
/wp-content/directory. -
Locate the
pluginsfolder. -
Temporarily rename the folder to
plugins_deactivated. This action automatically disables all active plugins without deleting any data. -
Attempt to load your website:
-
If the site loads successfully, rename the folder back to
plugins. -
Log into your WordPress dashboard, navigate to Plugins > Installed Plugins, and activate them individually to isolate the specific plugin causing the conflict.
-
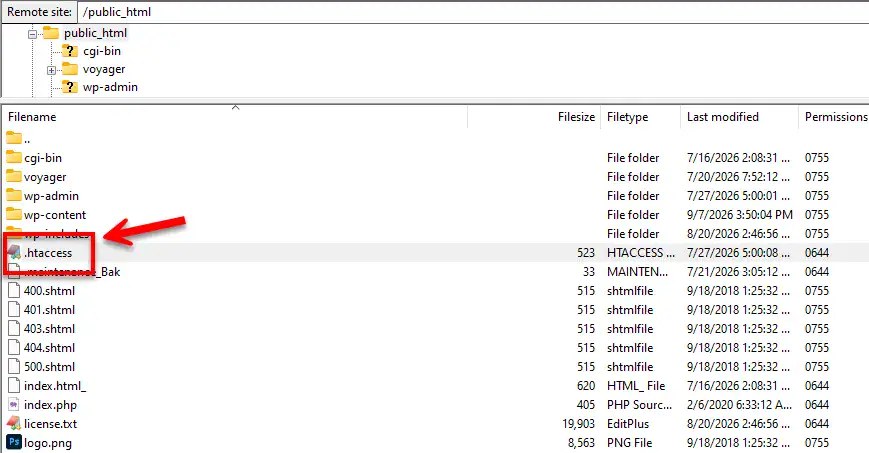
Step 4: Reset the .htaccess File
Corrupted directives inside the Apache .htaccess file can create persistent redirection loops at the server level.
-
Connect via FTP or your hosting File Manager and navigate to the root directory (often
public_html). -
Download your current
.htaccessfile to your computer as a safety backup. -
Delete the
.htaccessfile from your server. -
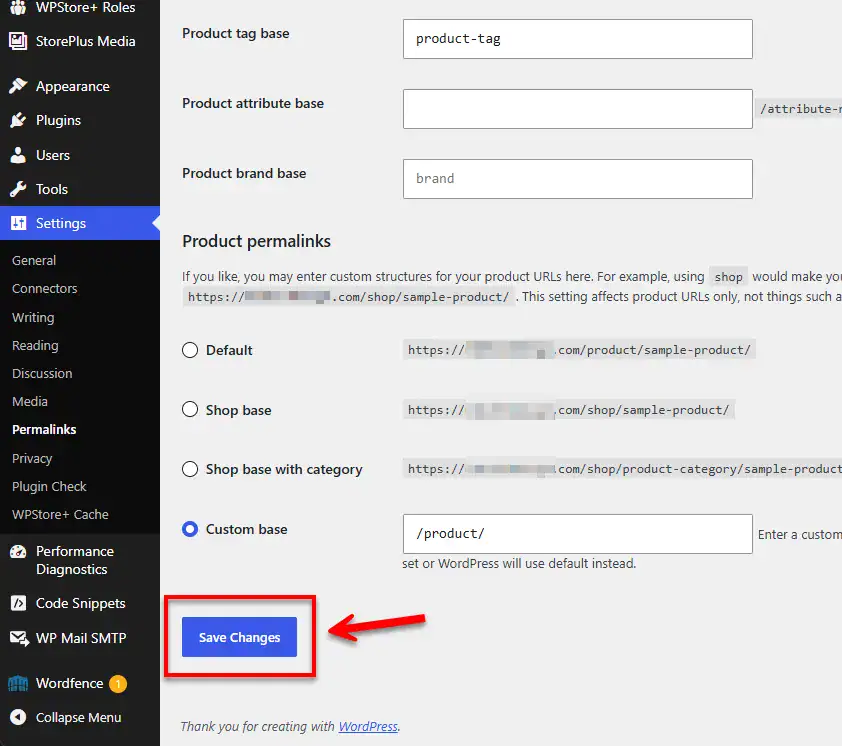
Attempt to refresh your site. If it loads properly, open your WordPress admin dashboard, navigate to Settings > Permalinks, and click Save Changes to generate a clean, default
.htaccessfile automatically.
Testing the Fix
Once you have applied the troubleshooting steps, verify that your site configuration is stable before resuming normal operations:
-
HTTP Status Code Check: Use a free online HTTP header check tool (or terminal
curl -IL [https://example.com](https://example.com)) to trace response codes. You should see a single301or302redirect leading directly to a200 OKstatus, confirming that the loop has ended. -
Cross-Browser Verification: Test your site across multiple browsers (Chrome, Safari, Firefox, Edge) to confirm that no lingering local cache obscures your results.
-
Mixed Content Audit: Ensure all internal scripts, styles, and media load through secure
https://protocols to prevent browser-level enforcement loops.
FAQs
Q: Why does the “Too Many Redirects” error occur only on the login page? A: This typically happens when secure cookies cannot be established properly. Verify that your site URL uses https:// across all database and configuration files, and ensure your browser accepts cookies from your domain.
Q: Will resetting my .htaccess file delete my website content? A: No. The .htaccess file controls server routing and rewrite rules; it contains no site pages, posts, or media. Deleting it resets custom server rewrites without affecting your database or media uploads.
Q: What is the most common cause of redirect loops with Cloudflare? A: Setting your Cloudflare SSL/TLS encryption setting to Flexible when your origin web server already redirects HTTP requests to HTTPS. Upgrading the Cloudflare setting to Full or Full (Strict) immediately resolves this loop.
Summary
The ERR_TOO_MANY_REDIRECTS error in WordPress is a technical misconfiguration rather than a fatal site crash. By systematically verifying domain settings in wp-config.php, clearing browser and edge-network caches, auditing plugin conflicts, and refreshing the .htaccess file, you can isolate the conflicting directive and restore access. Performing routine backups before implementing core file modifications remains the best practice for maintaining a resilient and operational WordPress environment.
Looking for more solutions to keep your website running smoothly? Explore our comprehensive [ Knowledge Base ] to find step-by-step technical guides, performance diagnostics, and quick fixes for common core, theme, and plugin conflicts. Whether you are dealing with critical server errors, broken layouts, database connection issues, or SSL authentication barriers, our curated library offers verified, beginner-friendly resources to help you resolve technical hurdles with confidence.