
Knowledge, WordPress Tutorials
How to Set Up StorePlus Manual QR Gateway with PromptPay for WooCommerce
Aug
StorePlus Manual QR Gateway with PromptPay for WooCommerce helps Thai WooCommerce store owners accept manual PromptPay QR payments at checkout.
This plugin generates a PromptPay QR code based on the WooCommerce order total and displays payment instructions after checkout. Customers scan the QR code using a supported banking app, while store owners manually verify the payment before processing the order.
This guide explains how to install, configure, test, and use the plugin safely.
Requirements
Before using the plugin, make sure your store meets the following requirements:
- WordPress is installed and working properly.
- WooCommerce is installed and activated.
- Your WooCommerce store currency is set to Thai Baht (THB).
- You have a PromptPay receiver ID registered with a Thai bank.
- Your store owner or admin can manually verify incoming payments.
StorePlus Manual QR Gateway is designed for manual PromptPay QR payment workflows. It does not connect to a bank API and does not automatically confirm payments.
Important Notes
StorePlus Manual QR Gateway is intended for WooCommerce stores in Thailand that accept payments in Thai Baht.
The plugin does not:
- Automatically verify payments.
- Connect to a bank API.
- Send order data to an external server.
- Use an external QR code generation service.
- Guarantee that every international banking app can scan or pay the QR code.
International QR payments may only work with participating cross-border QR payment applications. Availability depends on the customer’s bank, country, and payment provider.
Step 1: Install the Plugin
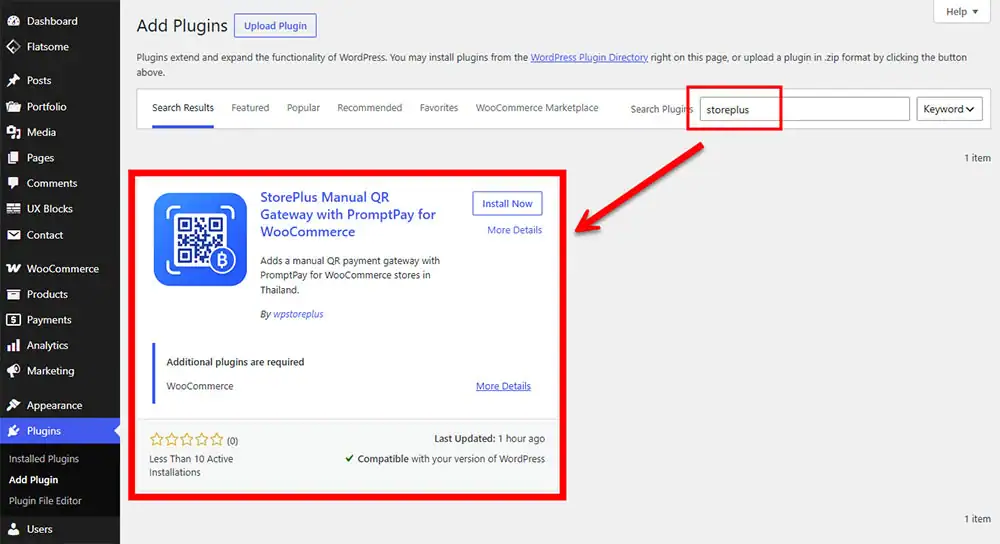
You can install the plugin from WordPress.org or upload the plugin ZIP file manually.
Option 1: Install from WordPress.org
- Log in to your WordPress admin dashboard.
- Go to Plugins > Add New.
- Search for StorePlus Manual QR Gateway with PromptPay for WooCommerce.
- Click Install Now.
- Click Activate.
Option 2: Upload the Plugin ZIP File
- Log in to your WordPress admin dashboard.
- Go to Plugins > Add New > Upload Plugin.
- Choose the plugin ZIP file.
- Click Install Now.
- Click Activate Plugin.
After activation, the plugin settings will be available inside WooCommerce.
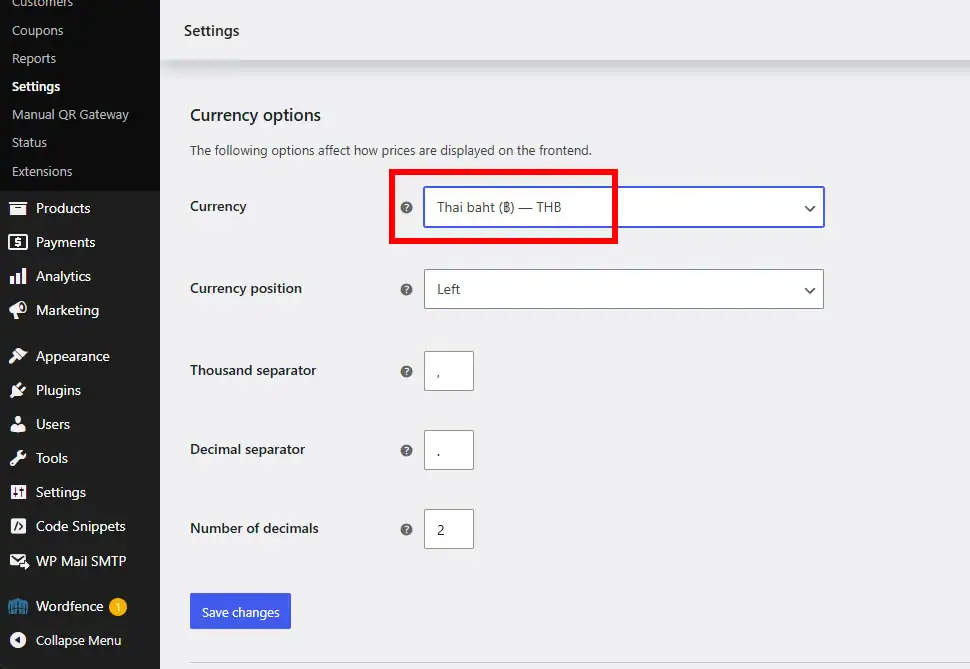
Step 2: Set WooCommerce Currency to Thai Baht
The plugin is designed to work with Thai Baht (THB).
To check or change your store currency:
- Go to WooCommerce > Settings > General.
- Scroll to Currency options.
- Set Currency to Thai Baht (THB).
- Click Save changes.
If your store currency is not THB, the PromptPay QR payment method may not be available at checkout.
Step 3: Enable PromptPay QR Payment
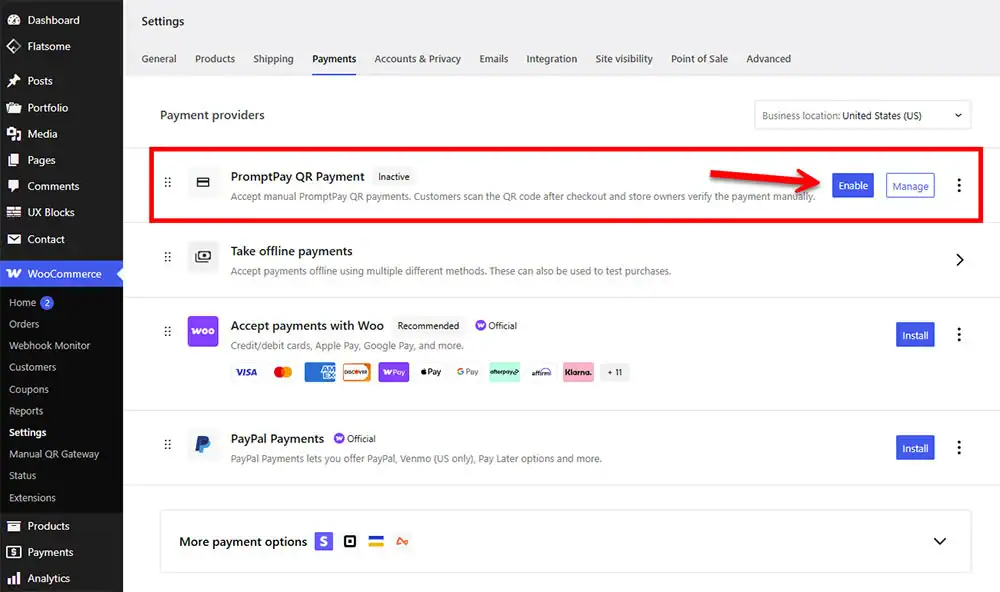
To enable the payment method:
- Go to WooCommerce > Settings > Payments.
- Find PromptPay QR Payment.
- Click the payment method name or manage button.
- Enable PromptPay QR Payment.
- Click Save changes after completing the settings.
Step 4: Configure Payment Settings
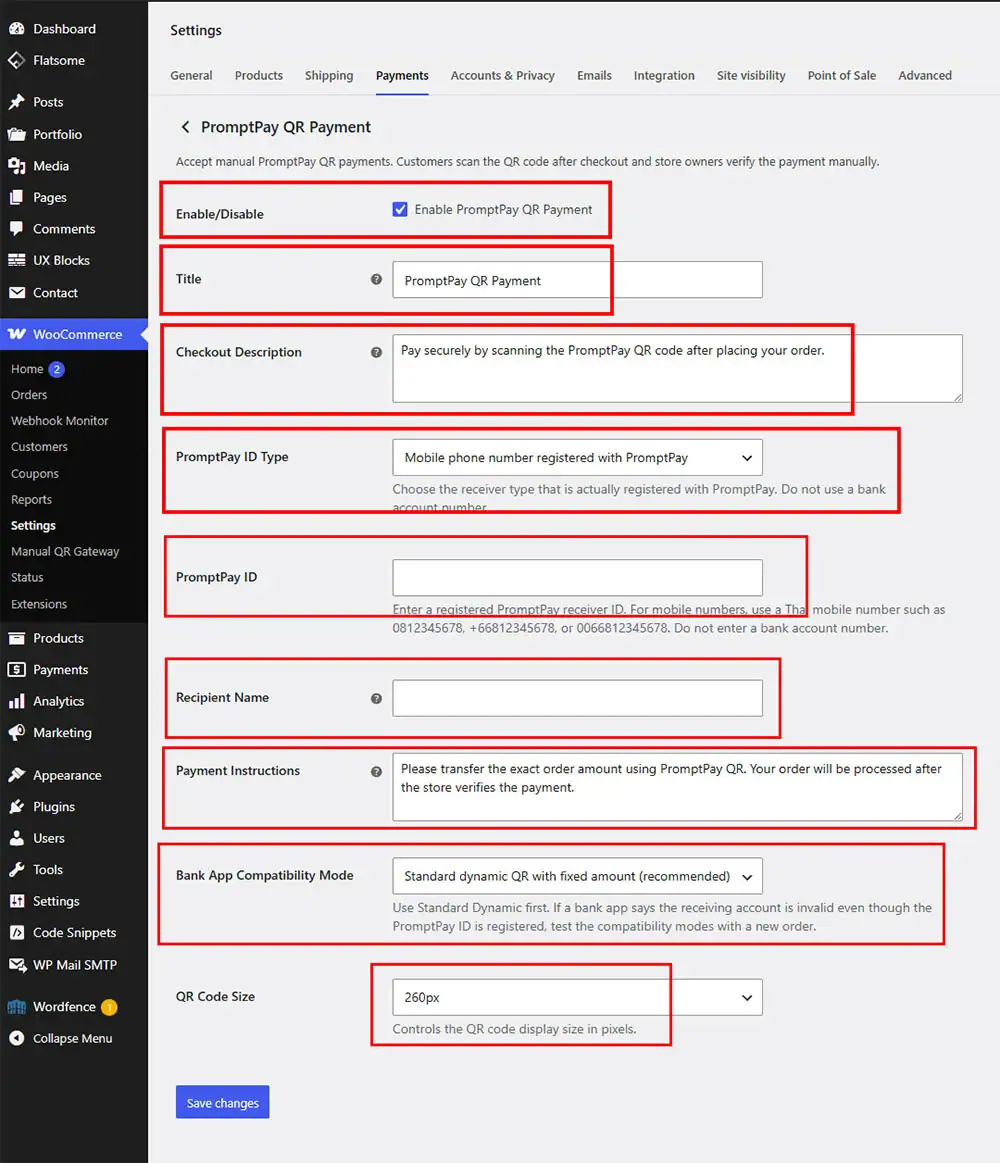
On the PromptPay QR Payment settings page, configure the following options.
Enable/Disable
Enable this option to make PromptPay QR Payment available at checkout.
Title
This is the payment method title customers will see at checkout.
Example:
PromptPay QR PaymentCheckout Description
This message appears under the payment method on the checkout page.
Example:
Pay securely by scanning the PromptPay QR code after placing your order.PromptPay ID Type
Choose the receiver type that matches the PromptPay ID registered with your bank.
Available options may include:
- Mobile phone number registered with PromptPay
- National ID / Tax ID registered with PromptPay
- E-Wallet ID, if supported
Use the actual PromptPay receiver ID registered with your bank. Do not enter a regular bank account number.
PromptPay ID
Enter your registered PromptPay receiver ID.
For mobile phone numbers, use a Thai mobile number registered with PromptPay, such as:
0812345678Do not enter a bank account number in this field.
Recipient Name
Enter the recipient name that helps customers recognize who they are paying.
Example:
Your Store NamePayment Instructions
This message will be shown to customers after checkout and may also appear in order emails.
Example:
Please transfer the exact order amount using PromptPay QR. Your order will be processed after the store verifies the payment.Bank App Compatibility Mode
Use the standard mode first.
Recommended setting:
Standard dynamic QR with fixed amountIf a customer’s banking app has trouble reading the QR code, you may test another compatibility mode with a new order.
QR Code Size
Choose the QR code display size.
Recommended setting:
260pxAfter configuring all fields, click Save changes.
Step 5: Test the Checkout Flow
Before accepting real customer payments, create a test order.
- Add a product to the cart.
- Go to checkout.
- Select PromptPay QR Payment.
- Click Place order.
- Confirm that the order is created successfully.
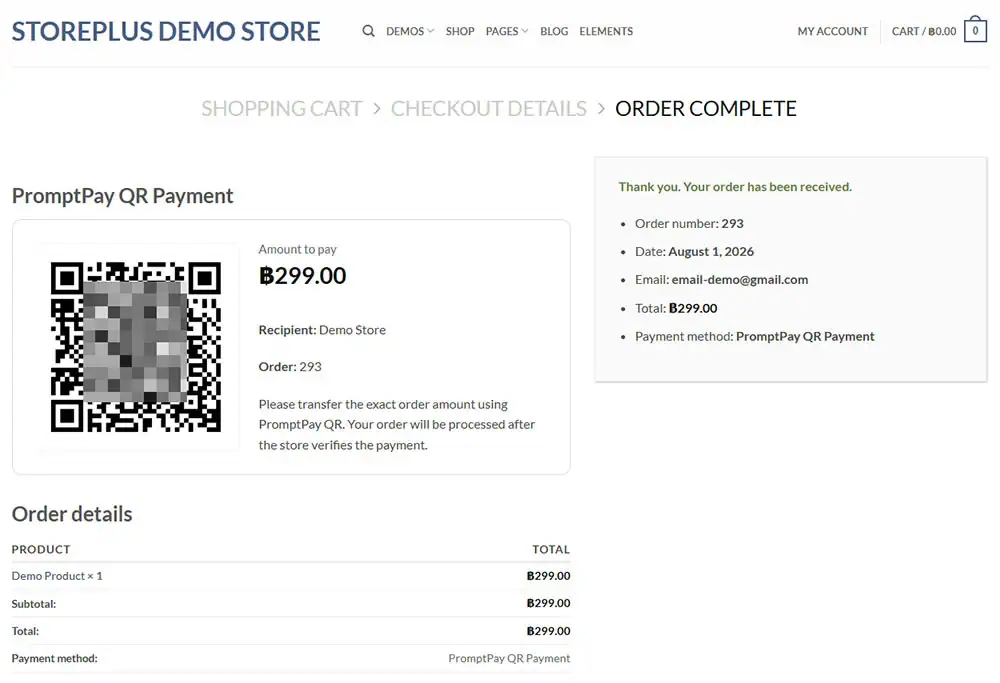
After checkout, the order received page should display:
- QR code
- Order amount
- Recipient name
- Order number
- Payment instructions
The order status should be set to On hold.
Step 6: Scan the QR Code with a Banking App
Use a supported banking app to scan the QR code.
Check that:
- The recipient name is correct.
- The payment amount is correct.
- The app can continue to the payment confirmation screen.
For testing, avoid using the same bank account to pay into itself. Some banking apps may block or reject self-payment attempts.
Use a separate bank account or another supported banking app to test the full payment flow.
Step 7: Manually Verify the Payment
This plugin uses a manual verification workflow.
After the customer places an order:
- The order status is set to On hold.
- The customer scans the PromptPay QR code and transfers the payment.
- The store owner checks the payment in the bank account.
- After confirming the payment, the store owner updates the WooCommerce order status manually.
Recommended order status after payment confirmation:
- Use Processing if the order still needs fulfillment.
- Use Completed if the order is fully completed.
Step 8: Check the Order Notes
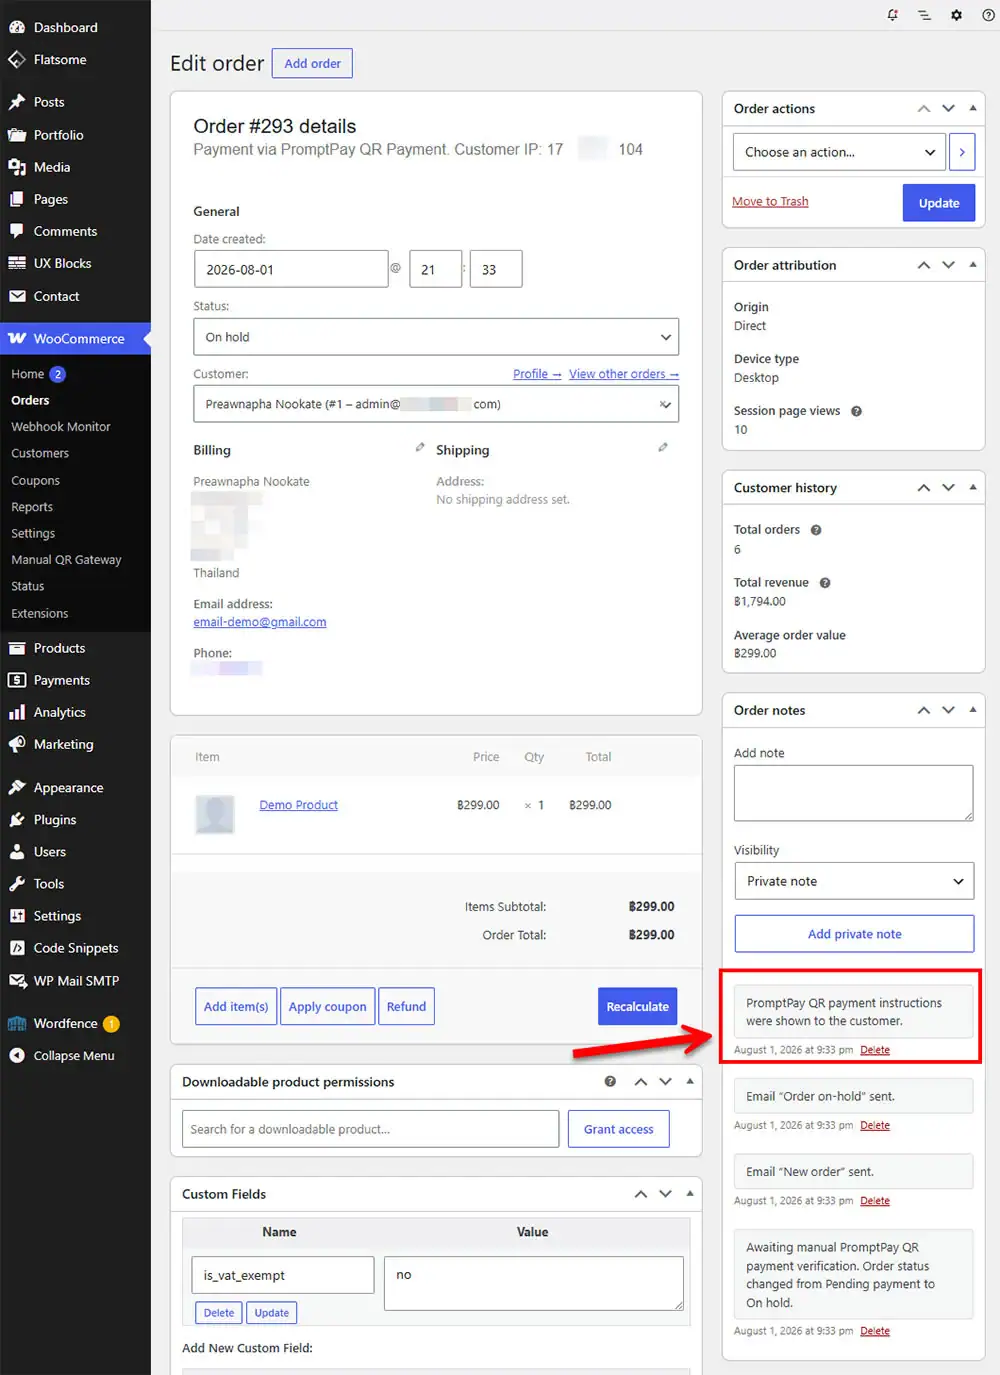
After checkout, WooCommerce may add an order note indicating that PromptPay QR payment instructions were shown to the customer.
You can review this in:
WooCommerce > Orders > Select Order > Order Notes
This helps store owners confirm that the customer was shown the payment instructions.
Troubleshooting
PromptPay QR Payment does not appear at checkout
Check the following:
- WooCommerce is activated.
- The payment method is enabled.
- Store currency is set to Thai Baht (THB).
- PromptPay ID is entered correctly.
- PromptPay ID type matches the actual registered receiver type.
Checkout shows “Invalid payment method”
This usually means the payment gateway is not available during checkout.
Check that:
- Store currency is THB.
- PromptPay QR Payment is enabled.
- PromptPay ID is valid.
- WooCommerce checkout is working correctly.
Banking app says the receiving account is invalid
Check that:
- The PromptPay ID is actually registered for receiving payments.
- You did not enter a normal bank account number.
- The selected PromptPay ID Type matches the entered ID.
- You are not trying to pay from the same bank account into itself.
- You are testing with a supported Thai banking app.
QR code appears but the amount is incorrect
Check the WooCommerce order total and currency settings.
The plugin generates the QR code based on the WooCommerce order total in Thai Baht.
Customer paid, but the order status did not change automatically
This is expected behavior.
StorePlus Manual QR Gateway does not automatically verify payments. The store owner must manually verify the payment and update the order status.
Frequently Asked Questions
Does this plugin automatically verify payments?
No. The plugin is designed for manual PromptPay QR payments. Store owners must manually verify payments through their bank account.
Does this plugin connect to a bank API?
No. The plugin does not connect to a bank API.
Does this plugin send order data to StorePlus or another external server?
No. The plugin generates PromptPay QR codes locally and does not send order data to external servers.
Can I use a normal bank account number as the PromptPay ID?
No. You must use a registered PromptPay receiver ID, such as a supported mobile phone number, National ID, Tax ID, or other supported receiver type.
Does this plugin support currencies other than THB?
The plugin is designed for Thai Baht (THB). For best results, set your WooCommerce store currency to Thai Baht.
Can international customers use this payment method?
Only in limited cases. Some cross-border QR payment apps may support Thai QR / PromptPay payments, but availability depends on the customer’s bank, country, and payment provider.
Is this an official PromptPay or WooCommerce plugin?
No. StorePlus Manual QR Gateway is an independent plugin. It is not affiliated with, endorsed by, or officially provided by PromptPay, WooCommerce, or any bank.
Recommended Setup Summary
For most Thai WooCommerce stores, we recommend the following setup:
- Store currency: Thai Baht (THB)
- Payment method title: PromptPay QR Payment
- PromptPay ID Type: Mobile phone number registered with PromptPay
- Bank App Compatibility Mode: Standard dynamic QR with fixed amount
- QR Code Size: 260px
- Order verification: Manual
Support
If you need help with setup, please visit the plugin support page on WordPress.org or contact StorePlus support through the official WPStore+ website.
Before contacting support, please prepare:
- WordPress version
- WooCommerce version
- Plugin version
- Store currency
- PromptPay ID Type used
- Screenshot of the checkout or order received page, if relevant
Looking for more WordPress and WooCommerce tips? Return to our main Knowledge Base to explore more step-by-step tutorials, troubleshooting guides, and best practices for your website.