
Knowledge, WordPress Troubleshooting
How to Fix WordPress Sitemap “Couldn’t Fetch” Errors in Google Search Console
Aug
XML sitemaps help search engines discover important pages, posts, products, categories, and other content on a WordPress website.
However, Google Search Console may sometimes report a “Couldn’t fetch” error for one or more sitemap files, even when the main sitemap index appears to be processed successfully.
For example, Google may successfully read:
/sitemap_index.xml
/category-sitemap.xml
/product_cat-sitemap.xml
But fail to fetch:
/page-sitemap.xml
/post-sitemap.xml
/product-sitemap.xml
This situation does not always mean that the entire sitemap system is broken. In many cases, the issue is caused by caching, firewall rules, security challenges, incorrect rewrite rules, or an invalid server response.
This guide explains how to identify the cause and restore normal sitemap access.
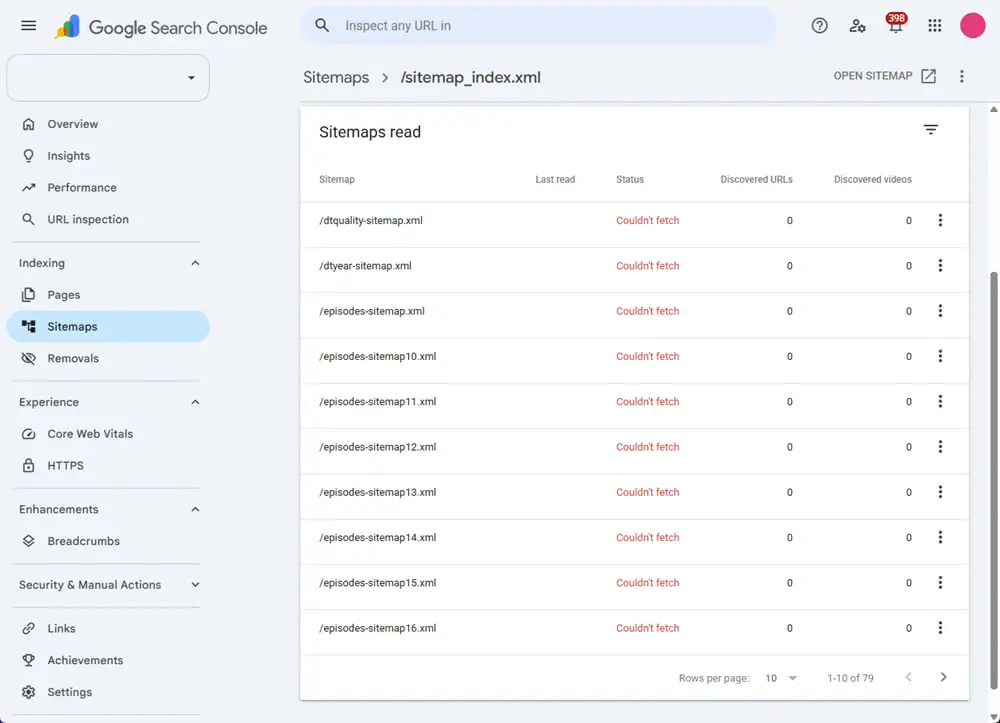
Table of Contents
- What Does “Couldn’t Fetch” Mean?
- Test the Sitemap Outside WordPress
- Check the HTTP Response
- Refresh WordPress Permalink Rules
- Refresh the SEO Plugin Sitemap
- Exclude XML Sitemaps from Caching
- Check Cloudflare Security Events
- Check Wordfence and Other Security Plugins
- Review PHP and Server Error Logs
- Test for Plugin or Theme Conflicts
- Resubmit the Sitemap in Google Search Console
- Final Troubleshooting Checklist
- Frequently Asked Questions
1. What Does “Couldn’t Fetch” Mean?
The “Couldn’t fetch” status means that Google was unable to retrieve or process a sitemap file successfully.
Possible causes include:
- The sitemap returned a
403 Forbiddenresponse. - The sitemap returned a
404 Not Foundresponse. - The server returned a
500,502, or504error. - A caching system served an outdated or incomplete response.
- Cloudflare displayed a challenge page instead of XML.
- A security plugin blocked Googlebot.
- The sitemap redirected incorrectly.
- The server returned HTML instead of XML.
- A PHP error interrupted sitemap generation.
- WordPress rewrite rules were outdated.
The main sitemap index may still appear as successful because Google can access the index file while failing to fetch one or more child sitemap files referenced inside it.
2. Test the Sitemap Outside WordPress
Start by opening each affected sitemap manually.
For example:
https://example.com/page-sitemap.xml
https://example.com/post-sitemap.xml
https://example.com/product-sitemap.xml
Test them in:
- A private or Incognito browser window
- A browser where you are not logged into WordPress
- A mobile internet connection
- A different network, when possible
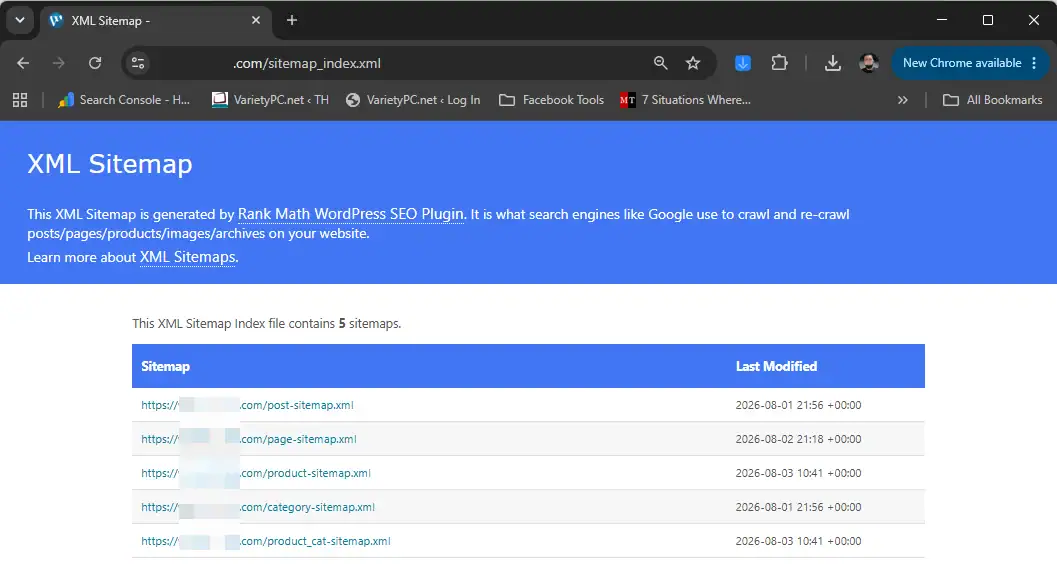
A working sitemap should:
- Open without requiring authentication
- Display XML content
- Return without a CAPTCHA
- Avoid Cloudflare or security challenge pages
- Avoid redirect loops
- Avoid blank pages
- Avoid PHP warnings or fatal errors
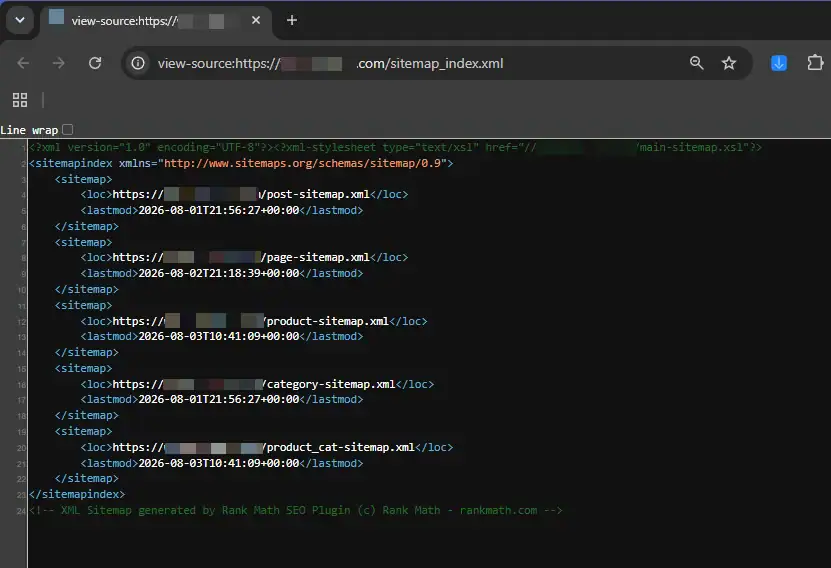
The source code normally begins with content similar to:
<?xml version="1.0" encoding="UTF-8"?>If the sitemap works while you are logged in but fails in an Incognito window, a firewall, caching system, or security rule may be treating anonymous visitors differently.
3. Check the HTTP Response
A sitemap can appear to open in a browser while still returning an incorrect HTTP response.
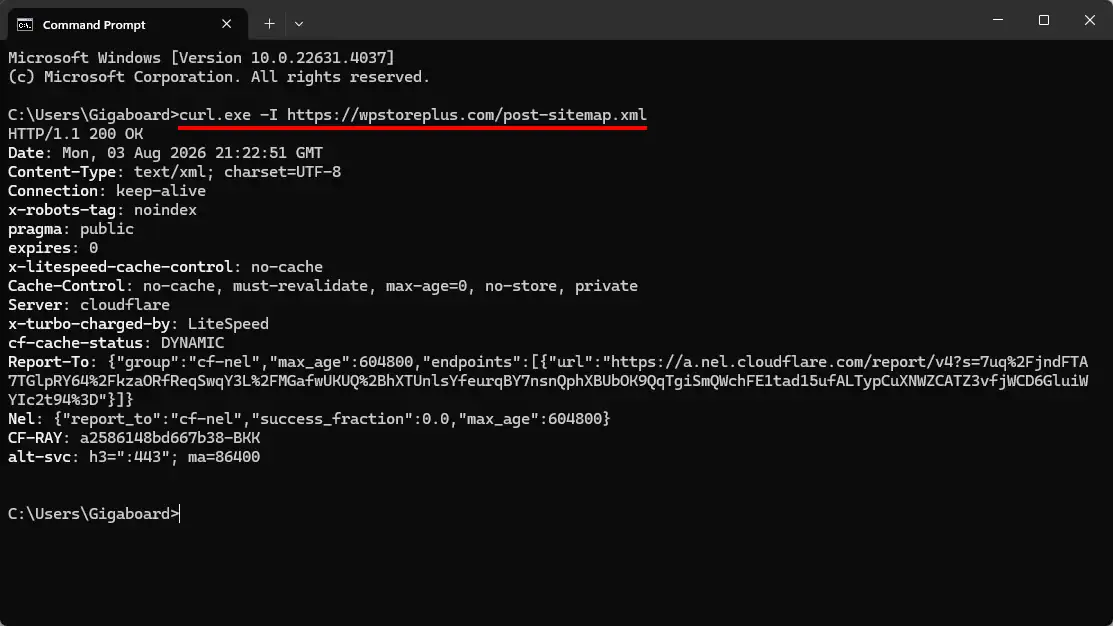
You can inspect the response by using the browser’s developer tools or a command-line utility such as curl.
On Windows, open Command Prompt and run:
curl.exe -I https://example.com/page-sitemap.xml
curl.exe -I https://example.com/post-sitemap.xml
curl.exe -I https://example.com/product-sitemap.xml
You can also simulate a Googlebot request:
curl.exe -A "Googlebot" -I https://example.com/page-sitemap.xmlA normal response should look similar to:
HTTP/2 200
content-type: application/xml
A text/xml content type may also be valid.
Common HTTP Responses
| HTTP response | Possible cause |
|---|---|
200 OK with XML |
The sitemap is currently accessible |
200 OK with HTML |
A challenge, cached error page, or application error may be returned |
301 or 302 |
Check the redirect destination |
403 Forbidden |
Firewall, hosting security, or access restrictions |
404 Not Found |
Permalink or sitemap rewrite problem |
429 Too Many Requests |
Rate limiting |
500 Internal Server Error |
PHP error or plugin conflict |
502 Bad Gateway |
Web server or PHP processing problem |
504 Gateway Timeout |
Sitemap generation or database query took too long |
Pay close attention to responses that return 200 OK but contain HTML. Google may receive a challenge page or cached error document instead of a valid XML sitemap.
4. Refresh WordPress Permalink Rules
WordPress SEO plugins often generate sitemap URLs dynamically through rewrite rules.
If those rules become outdated, some sitemap URLs may return 404 errors or fail intermittently.
To refresh them:
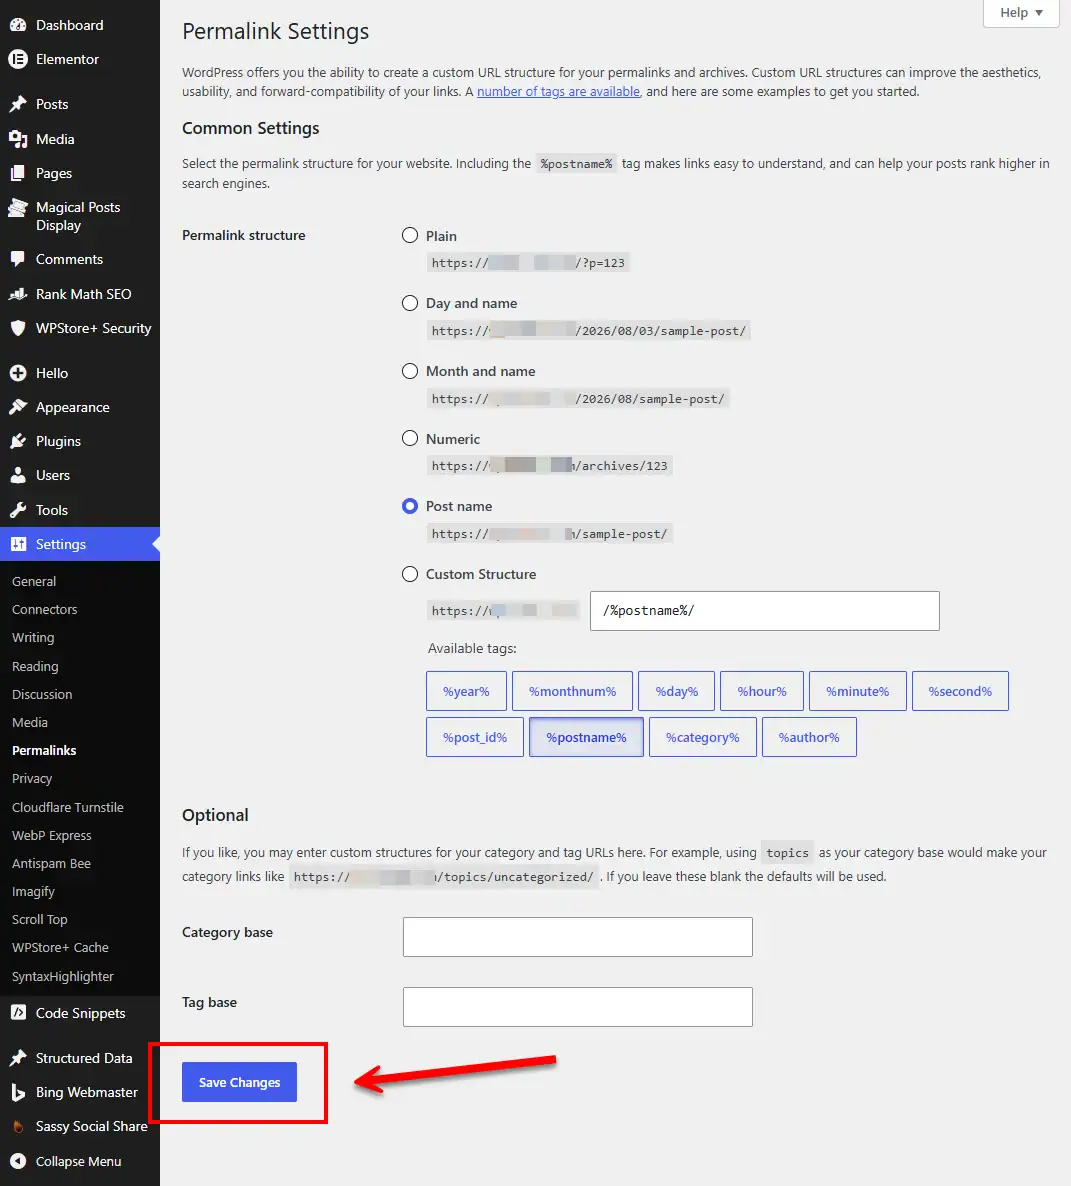
- Sign in to the WordPress dashboard.
- Go to Settings → Permalinks.
- Do not change the permalink structure.
- Click Save Changes.
- Clear all available caches.
- Test the sitemap URLs again.
Saving the permalink settings forces WordPress to regenerate its rewrite rules.
This simple step is especially useful after:
- Changing SEO plugins
- Migrating a website
- Changing a domain
- Modifying server configuration
- Updating rewrite rules
- Restoring a website from a backup
5. Refresh the SEO Plugin Sitemap
If you use Rank Math, Yoast SEO, or another sitemap provider, refresh its sitemap settings.
For Rank Math:
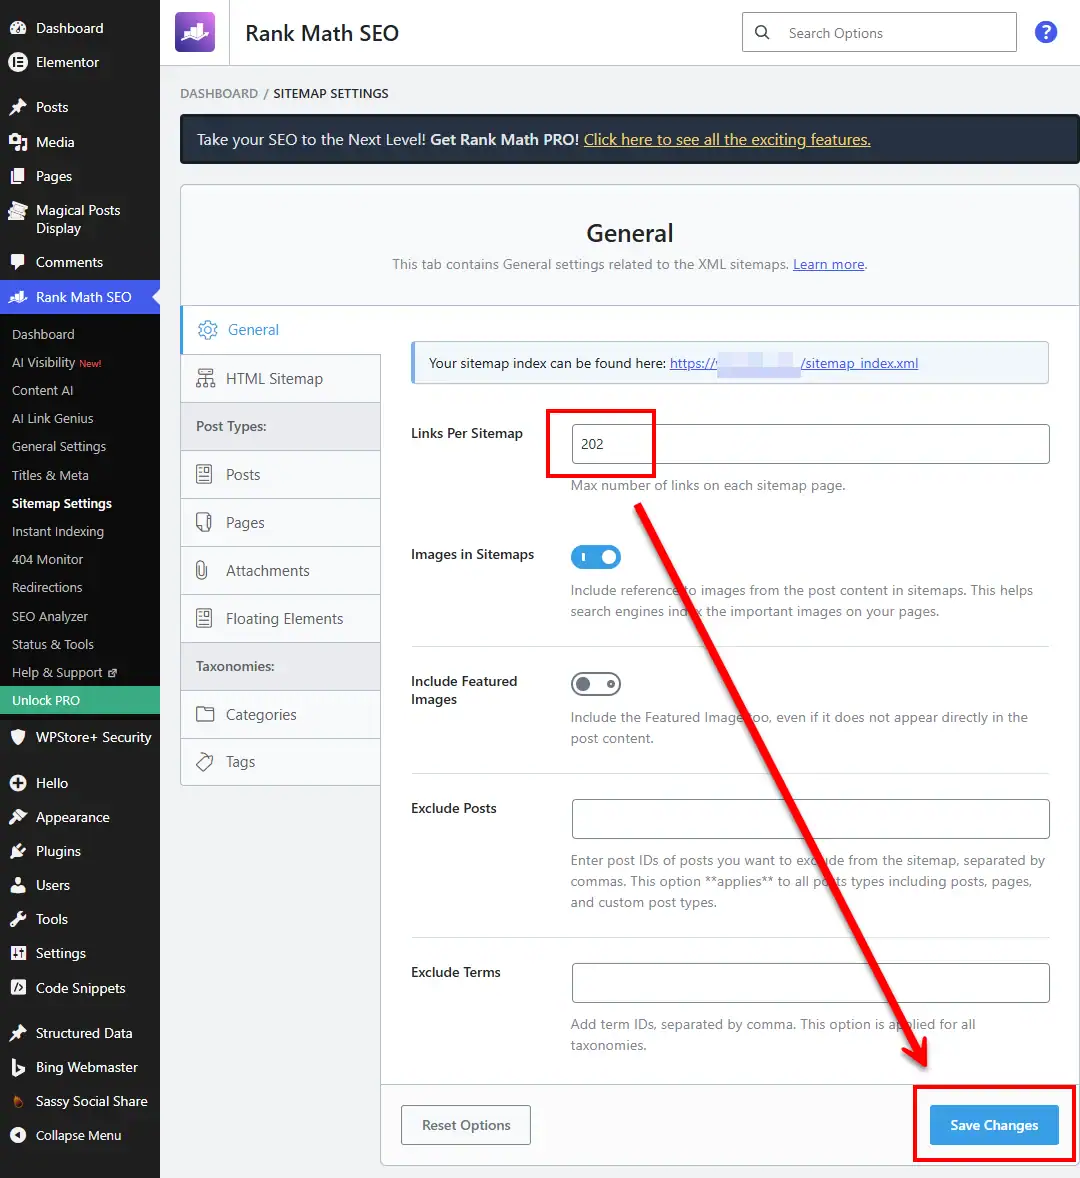
- Go to Rank Math SEO → Sitemap Settings.
- Open the General section.
- Change the Links Per Sitemap value temporarily.
- Save the settings.
- Change the value back to the preferred number.
- Save the settings again.
- Go to Settings → Permalinks.
- Click Save Changes.
- Purge all caches.
Also confirm that sitemap support is enabled for the required content types.
Check settings for:
- Posts
- Pages
- Products
- Categories
- Product categories
- Custom post types
- Custom taxonomies
If a content type is intentionally excluded from the sitemap, it should not appear in the sitemap index.
6. Exclude XML Sitemaps from Caching
Caching is one of the most important areas to check when a sitemap index works but some child sitemaps return “Couldn’t fetch.”
XML sitemaps are generated dynamically and may change when content is published, updated, deleted, or excluded from indexing.
If a page cache stores a sitemap incorrectly, it may serve:
- An outdated sitemap
- A partially generated sitemap
- An empty response
- A cached 404 page
- A cached 500 error
- An HTML challenge page
- An incorrect content type
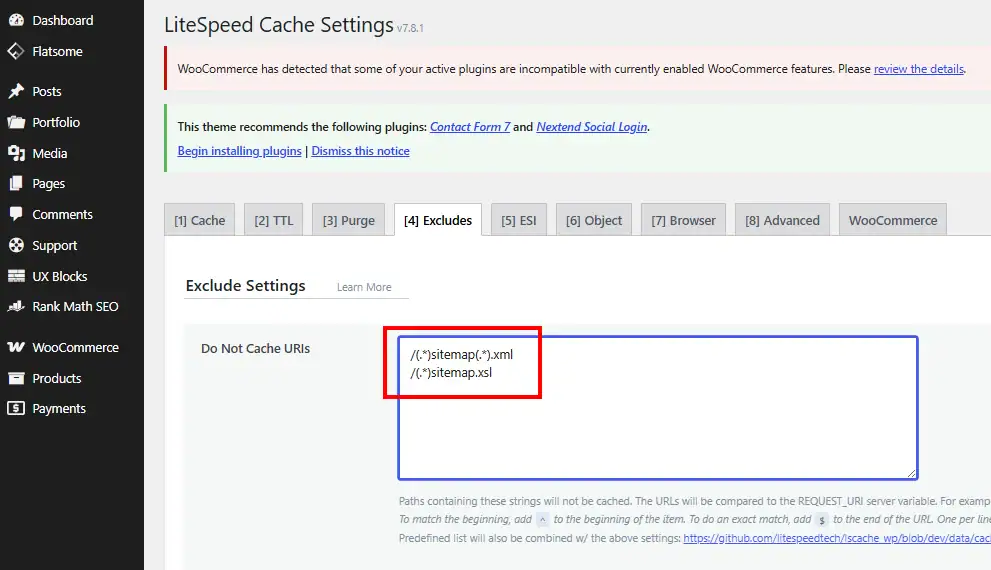
Add sitemap URLs to the cache exclusion settings of your caching plugin or server cache.
Common exclusion patterns include:
/sitemap_index.xml
/sitemap.xml
/*-sitemap.xml
/*-sitemap*.xml
/*sitemap*.xsl
If the caching system supports regular expressions, an exclusion may look similar to:
^/(.*)?sitemap(.*)\.(xml|xsl)$The exact format varies between caching plugins, hosting platforms, and reverse proxy systems. Confirm the required syntax before adding wildcard or regular-expression rules.
Where to Check for Sitemap Caching
Review all caching layers used by the website:
- WordPress caching plugin
- Hosting-level page cache
- Nginx FastCGI cache
- LiteSpeed Cache
- Varnish
- Redis full-page caching
- Cloudflare Cache Rules
- Cloudflare APO
- Custom “Cache Everything” rules
- CDN edge caching
After adding the exclusions, purge every caching layer.
Then test:
/sitemap_index.xml
/page-sitemap.xml
/post-sitemap.xml
/product-sitemap.xml
In our case, excluding sitemap files from caching restored normal sitemap access on two separate WordPress websites that showed the same Google Search Console error.
This confirmed that the sitemap generator itself was working, while the caching layer was interfering with the XML responses.
7. Check Cloudflare Security Events
Cloudflare may block, challenge, rate-limit, or cache sitemap requests depending on the configured security rules.
Go to:
Cloudflare Dashboard → Security → Events
Search for requests containing:
sitemapYou can also search for specific paths:
/page-sitemap.xml
/post-sitemap.xml
/product-sitemap.xml
Look for actions such as:
- Block
- Managed Challenge
- JavaScript Challenge
- Rate Limited
- Bot protection
- Custom WAF rule
- Browser integrity checks
If a Cloudflare rule is affecting sitemap URLs, create a narrow exception for sitemap paths rather than disabling the entire firewall.
A rule condition may be based on:
URI Path contains "sitemap"Depending on the existing configuration, the sitemap exception may skip:
- Managed Challenge
- Rate limiting
- Bot protection
- Selected custom WAF rules
- Edge caching
Avoid creating an overly broad rule that bypasses all protection for the entire website.
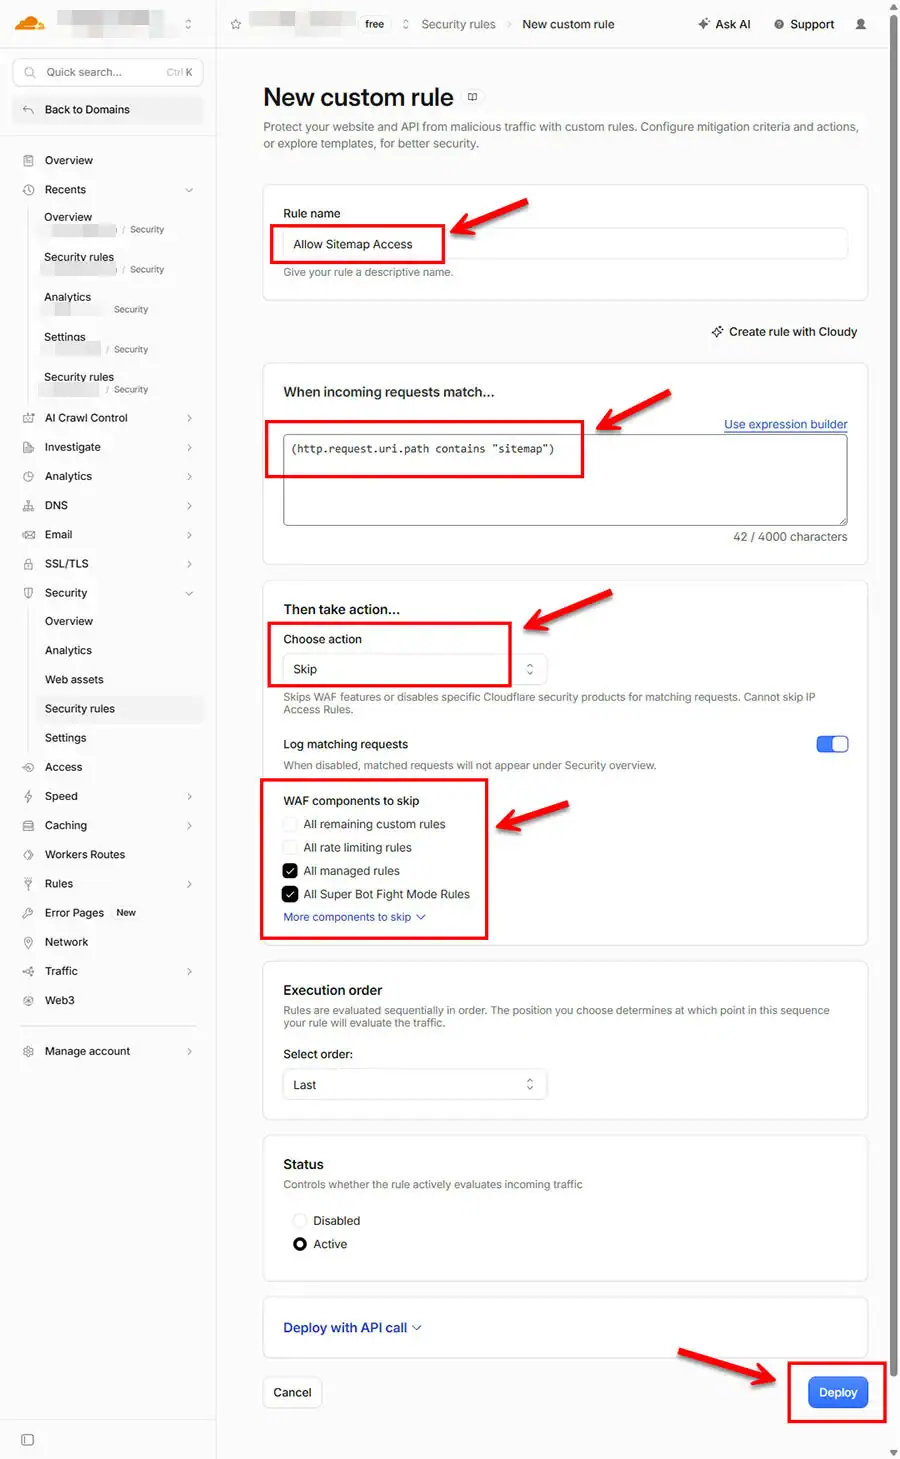
It is recommended to select only specific options based on necessity as follows:
1. Recommended Options to Check (Skip)
| Option | Reason to Skip |
| All managed rules | Recommended — Cloudflare’s Managed Rules often misinterpret sitemap crawlers (such as Search Engines or Plugins) as suspicious activity. Skipping this section is the best way to prevent issues. |
| All Super Bot Fight Mode Rules | Recommended — If your sitemap is being blocked, it is frequently caused by Super Bot Fight Mode, which tends to block most types of crawlers and bots except verified Googlebots. |
2. Conditional Options (Enable only if issues persist)
| Option | Recommendation |
| All rate limiting rules | Check only if needed — Add this option only if you see the action Rate Limited on your sitemap files in Security → Events. Otherwise, keep it unchecked so Rate Limiting continues to protect against spam bots overloading your sitemap. |
3. Options Not Recommended to Check
| Option | Reason |
| All remaining custom rules | Not Recommended (Unless strictly necessary) — If you have set up other custom security rules (e.g., blocking malicious IPs or specific countries), those protections will also be bypassed. |
Summary Recommendation for Configuration
To start, check only these 2 options:
-
All managed rules -
All Super Bot Fight Mode Rules
After clicking Deploy, test your sitemap fetching again. If you still encounter Rate Limit issues, return to the settings and check All rate limiting rules.
8. Check Wordfence and Other Security Plugins
Security plugins may classify automated sitemap requests as suspicious, especially when rate limiting or strict bot protection is enabled.
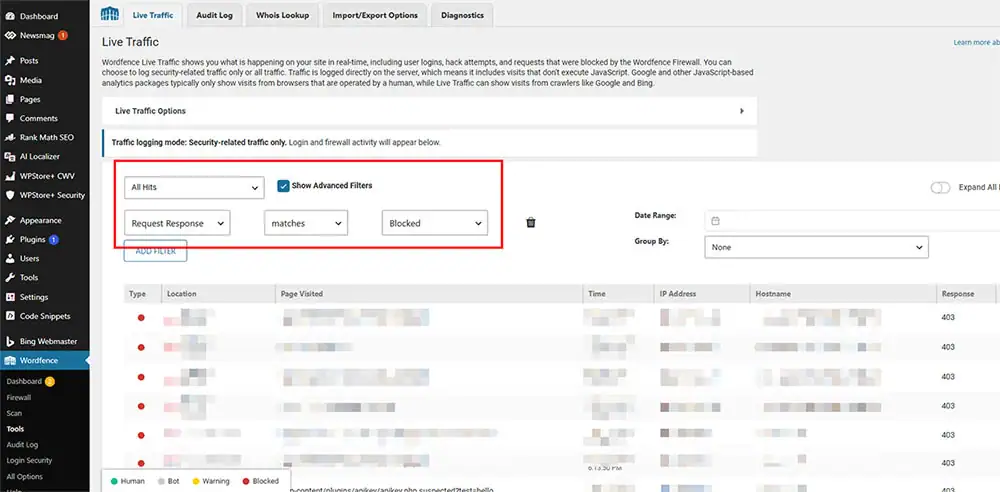
For Wordfence:
- Go to Wordfence → Tools → Live Traffic.
- Filter for blocked requests.
- Search for
sitemap. - Review the action and firewall rule that handled the request.
- Check whether the request received a
403or rate-limit response.
Possible causes include:
- Aggressive crawl rate limits
- Country blocking
- IP blocking
- Fake Googlebot detection
- Custom firewall rules
- Repeated-request protection
- Hosting-level ModSecurity rules
Do not disable the complete firewall as the first solution.
Instead, identify the specific rule and create the smallest safe exception necessary for legitimate sitemap requests.
9. Review PHP and Server Error Logs
If a sitemap is blank, incomplete, or returns a server error, review the website’s logs.
Useful log locations include:
/wp-content/debug.logYou should also inspect:
- PHP error log
- Nginx error log
- Apache error log
- PHP-FPM log
- Hosting application log
- ModSecurity audit log
- Cloudflare security log
Look for errors that occur at the same time the sitemap URL is requested.
Possible errors include:
- PHP fatal errors
- Memory exhaustion
- Maximum execution time exceeded
- Database query errors
- Undefined function errors
- Plugin compatibility problems
- Output sent before XML headers
- Invalid characters in generated XML
A PHP warning or unexpected output before the XML declaration may make the sitemap invalid even when the page returns an HTTP 200 response.
You can learn how to run Debug.log from this link.
10. Test for Plugin or Theme Conflicts
If only specific sitemap types fail, inspect plugins and custom code that modify WordPress content queries.
For example, if taxonomy sitemaps work but page, post, and product sitemaps fail, investigate code that affects post-type queries.
Potential sources include:
- Code Snippets
- Custom theme functions
- Child theme modifications
pre_get_postsfilters- Rank Math sitemap filters
- Product visibility filters
- WooCommerce query customizations
- Canonical URL modifications
- Multilingual plugins
- Redirect plugins
- Database optimization plugins
- Legacy code from a previous SEO plugin
Testing should preferably be performed on a staging website.
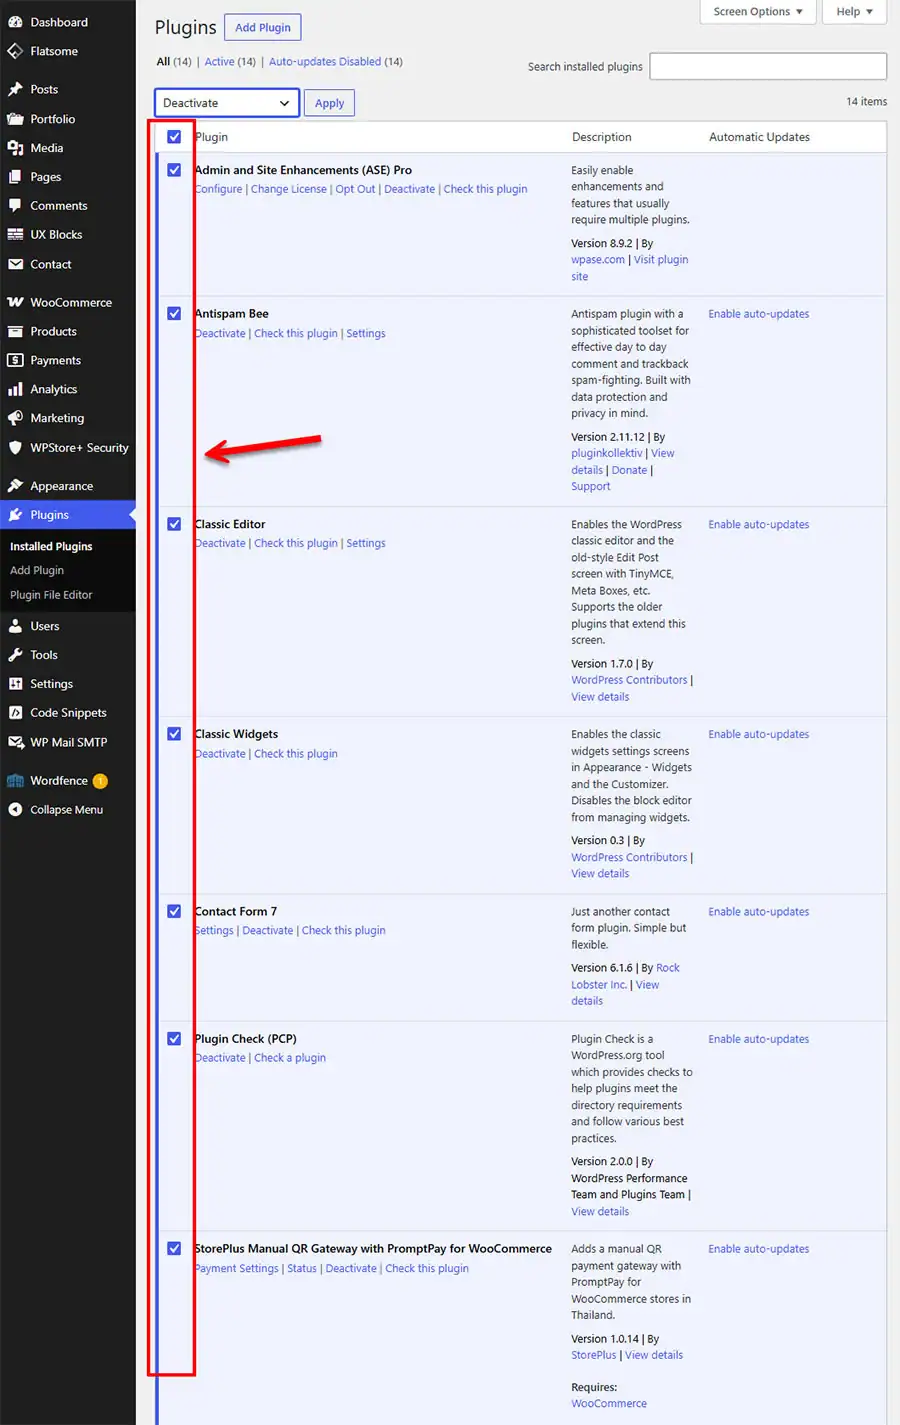
A safe troubleshooting process is:
- Create a full backup.
- Test with a default WordPress theme.
- Disable nonessential plugins temporarily.
- Keep only the SEO plugin active.
- Test the sitemap again.
- Reactivate plugins individually.
- Identify which plugin causes the issue to return.
Do not perform extensive plugin deactivation on a production WooCommerce store during active customer sessions unless a maintenance plan is in place.
11. Check for Redirect Problems
Every sitemap should ideally be accessible from one consistent canonical URL.
Check for redirects involving:
- HTTP to HTTPS
wwwto non-www- Non-
wwwtowww - Trailing slashes
- Uppercase and lowercase paths
- Old SEO plugin sitemap URLs
- Domain migration rules
- Language-specific URLs
For example:
http://www.example.com/sitemap_index.xmlMay redirect to:
https://example.com/sitemap_index.xmlA single clean redirect is normally acceptable. However, multiple redirects or redirect loops can prevent Google from retrieving the sitemap reliably.
Make sure the sitemap URL submitted in Google Search Console uses the final preferred protocol and hostname.
You can find more information at this link.
Why Your WordPress Sitemap May Fail on the WWW Version but Work on the Non-WWW Version
12. Resubmit the Sitemap in Google Search Console
After fixing the issue:
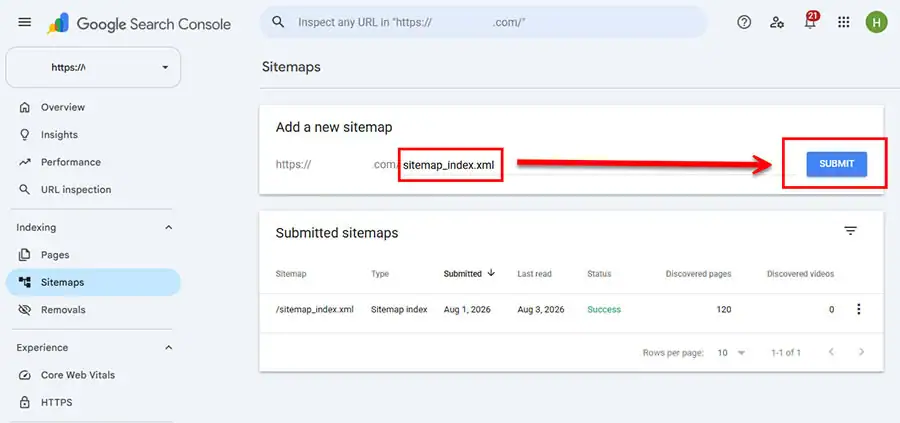
- Open Google Search Console.
- Select the correct website property.
- Go to Indexing → Sitemaps.
- Open the existing sitemap report.
- Confirm that the sitemap URL is correct.
- Submit the sitemap index again if necessary.
- Wait for Google to fetch the sitemap again.
The recommended submission is usually:
sitemap_index.xmlYou normally do not need to submit every child sitemap separately when they are already referenced by the sitemap index.
The old “Couldn’t fetch” status may remain visible until Google performs another fetch. It does not always disappear immediately after the technical issue is corrected.
Final Troubleshooting Checklist
Use this checklist whenever Google Search Console reports a sitemap fetch error:
- Open the sitemap in an Incognito window.
- Confirm that the response contains XML.
- Check the HTTP status code.
- Confirm the content type is XML.
- Save WordPress permalink settings.
- Refresh the SEO plugin sitemap settings.
- Exclude XML sitemap files from all caching layers.
- Purge WordPress, server, and CDN caches.
- Check Cloudflare Security Events.
- Check Wordfence Live Traffic.
- Review PHP and server error logs.
- Inspect redirects.
- Test for plugin or theme conflicts.
- Resubmit the sitemap index in Google Search Console.
Frequently Asked Questions
Why does the sitemap index work while child sitemaps fail?
The sitemap index and its child sitemaps are separate HTTP requests. Google may successfully retrieve the main index but receive an error, cached response, firewall challenge, or invalid XML when requesting one of the child sitemap files.
Should XML sitemaps be cached?
XML sitemaps generally do not need normal page caching. Excluding them from page cache helps prevent outdated, incomplete, or incorrect XML responses from being delivered to search engines.
Do I need to submit every child sitemap to Google?
Usually, no. Submitting the main sitemap_index.xml file is sufficient because it contains links to the child sitemaps.
Can Cloudflare cause sitemap errors?
Yes. Cloudflare caching, WAF rules, bot protection, rate limiting, or challenge pages can interfere with sitemap requests when the rules are too broad or incorrectly configured.
Can Wordfence block Googlebot from accessing a sitemap?
It is possible if strict rate limits, IP blocking, country blocking, or firewall rules are triggered. Check Wordfence Live Traffic before creating an exception.
Why does a sitemap return 200 OK but still fail?
An HTTP 200 response does not guarantee that the content is valid XML. The server may return an HTML challenge page, cached error page, PHP warning, or incomplete document while still using a 200 status.
How long does Google Search Console take to update the sitemap status?
The status updates after Google fetches the sitemap again. The timing is not guaranteed, so the old error may remain visible temporarily even after the sitemap has been fixed.
Should I delete and recreate the sitemap submission?
Not always. If the sitemap URL is correct, you can usually keep the existing submission and allow Google to retry. Resubmitting may be useful after confirming that the technical problem has been resolved.
Conclusion for WordPress sitemap couldn’t fetch
A WordPress sitemap “Couldn’t fetch” error does not always indicate a problem with the SEO plugin or sitemap generator.
When the sitemap index works but specific page, post, or product sitemaps fail, begin by checking:
- The actual HTTP response
- WordPress rewrite rules
- Sitemap settings
- Cache exclusions
- Cloudflare and security rules
- PHP and server logs
In the issue described in this guide, the sitemap files were being affected by caching. Adding XML sitemap URLs to the cache exclusion list and purging the existing cache restored normal sitemap operation.
For WordPress websites that use a caching plugin, hosting-level cache, or Cloudflare, excluding sitemap files from page caching should be considered an important configuration step.
Looking for more WordPress and WooCommerce tips? Return to our main Knowledge Base to explore more step-by-step tutorials, troubleshooting guides, and best practices for your website.